![The detailed guide to installing a second SSD in your computer [Full A Z]](https://ohhmua.com/wp-content/uploads/2020/08/The-detailed-guide-to-installing-a-second-SSD-in-your-computer-Full-A-Z-860x484.webp)
Your HDD or SSD may one day run out of storage space, and the solution at that point is to either delete old data or buy a new drive (in this case, an SSD) to transfer your data to the new SSD. This process isn’t too difficult, as long as you have enough space in your computer case, a few SATA cables, and, finally, using Windows Disk Management to set up your second drive. OK, let’s get started.

Steps to prepare and install the second SSD for your computer
Installing a second SSD in your computer involves two steps. First, you need to physically install the drive into the computer case, then you need to configure it in Windows so that the operating system recognizes it and you can use it.
Here’s what you need to install a second SSD in your computer:
- First, you need an empty bay in your computer case where you can mount the SSD.
- At least one available SATA port on your motherboard.
- The SSD itself.
- A screwdriver to open the case and secure the SSD in place.
- A SATA data cable.
- An available SATA power connector (this is built into your computer’s power supply).
- An adapter if you’re installing the SSD in a 5.25-inch drive bay (optional).
Important:
Laptops are an exception because most laptops do not have space to install a second SSD. If your laptop does have space, you won’t need a SATA cable since laptop drive bays come with integrated power and data connectors.
How to install the second SSD in your computer
Once you have all the components listed above and the necessary tools, you’re ready to install the second SSD into your computer case. You can also use this guide to install a third or fourth SSD, as long as your motherboard has enough SATA ports and you don’t exceed the number of SATA power cables available in your computer’s power supply.

Installing the second SSD in your computer
Note: Be careful to avoid static discharge when working inside your computer case. Use an anti-static wrist strap if you have one, or ground yourself in other ways, such as touching a metal surface before touching the case, or holding the reset button for about 20 seconds to drain all electricity (make sure the computer is unplugged first).
Here are the steps to install the second SSD in your computer:
- Unplug your computer from the power source and open the case.
- Locate the SSD mounting location.
-
You will need to remove the drive caddy from the SSD bay in your case and install the new SSD into it. If there’s no caddy, you can mount it directly into the SSD bay. Just align the SSD with the mounting holes in the bay and screw it in.

-
Depending on your case, the caddy may automatically snap into place, or you might need to use some sort of fastening method. If not, as mentioned above, you can directly insert the SSD and just screw it in place.

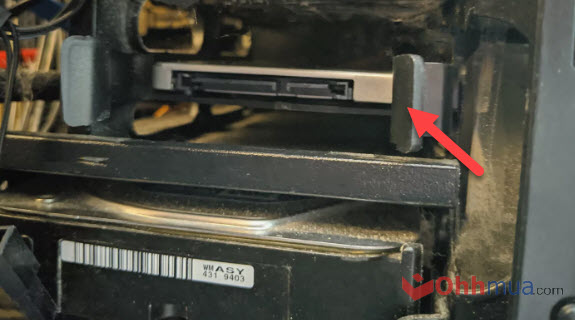
lắp ssd vào máy tính -
Next, find the SATA power cable inside your case and plug it into the longer connector on your SSD. It looks like the image below.

dây cấp nguồn sata -
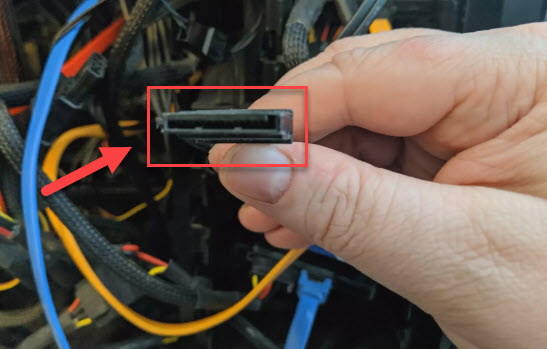
Then, connect the SATA data cable to the SSD, and plug the other end into a SATA port on your motherboard. The SATA power cable can be taken from the power supply unit and plugged into the SSD.


-
Finally, carefully check that all cables are securely connected and make sure no cables are loose. Close your computer case, and now let’s move on to the final step: setting up the drive in Windows.
How to configure the new SSD in Windows
Once you’ve successfully installed your second SSD, it’s time to turn on your computer and make sure everything is working. If Windows doesn’t detect any drives or peripherals, turn off the power and check for any loose or unplugged cables. If everything is working, you can proceed with configuring your new SSD.
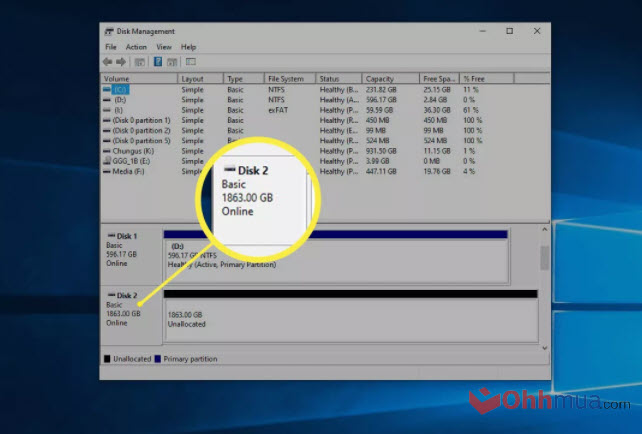
By default, Windows will see and recognize your second SSD, but it won’t be usable yet. Before you can use it, you’ll need to initialize and format the drive so that it can be recognized in Windows. Once this process is complete, your new SSD will be ready to store files, and you can start transferring data from your old drive to free up space.
Here’s how to set up your new SSD in Windows:
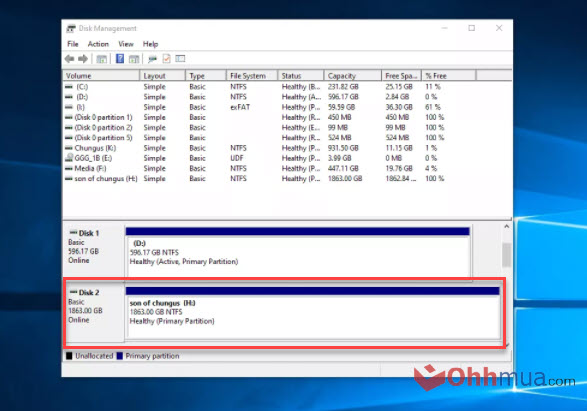
- Go to Control Panel > Disk Management. In Windows 7, right-click the Computer icon and select Manage > Disk Management.
- If prompted to initialize the disk, select GPT (GUID Partition Table) and click OK. If you’re using Windows 7, select MBR (Master Boot Record).


-
If the setup wizard starts automatically, skip to step 5. If not, scroll down in the Disk Management window until you find your new SSD. You can easily identify it because it will be the drive labeled as “unallocated.”

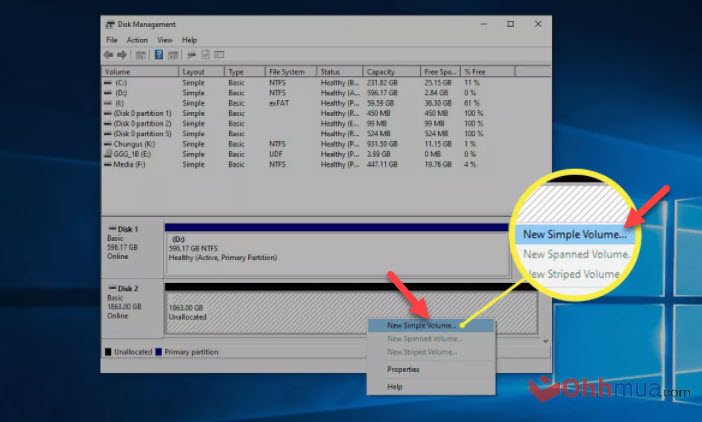
- Right-click the SSD and select “New Simple Volume.”

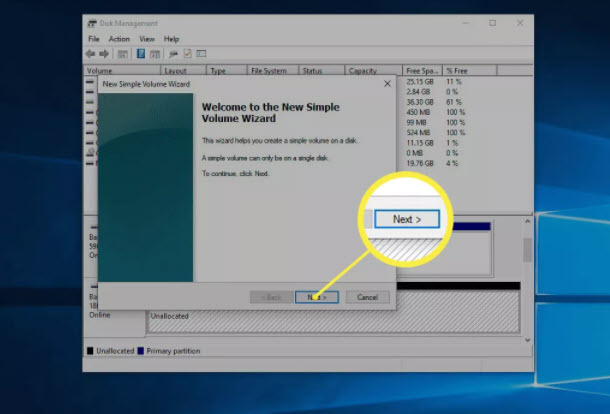
- Click Next.

- Ensure the two numbers match and click Next.

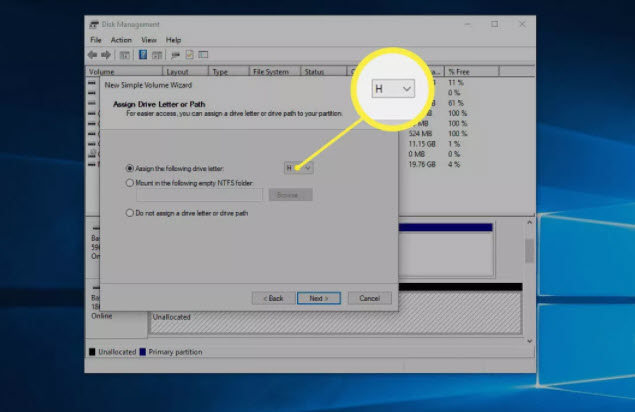
- Choose a drive letter. If you don’t have a preference, leave it at the default and click Next.

- Use the NTFS file system unless you have a reason to do otherwise. Generally, leave it at default and click Next.

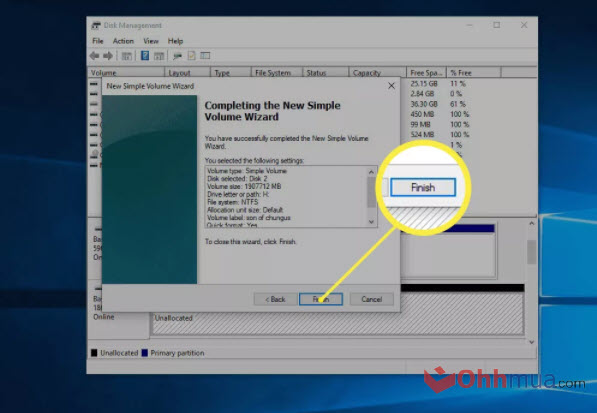
- Verify the information and click Finish.

-
Finally, your second SSD is ready to use. Done!


Conclusion
So, I’ve just walked you through the steps to install a second SSD. If you have any questions, feel free to leave a comment below. See you in the next article!