Introduction to BIOS Updates and Their Importance
When it comes to maintaining your computer’s performance and compatibility, updating the BIOS (Basic Input/Output System) on your Gigabyte H81M-D2V motherboard is one of the most critical tasks you can undertake. As an expert in hardware maintenance, I’ve seen firsthand how a simple BIOS update can resolve compatibility issues, enhance system stability, and even unlock new features for older hardware. The Gigabyte H81M-D2V, a popular budget-friendly motherboard from the Intel H81 chipset era, benefits greatly from these updates, especially if you’re running legacy software or adding newer components.
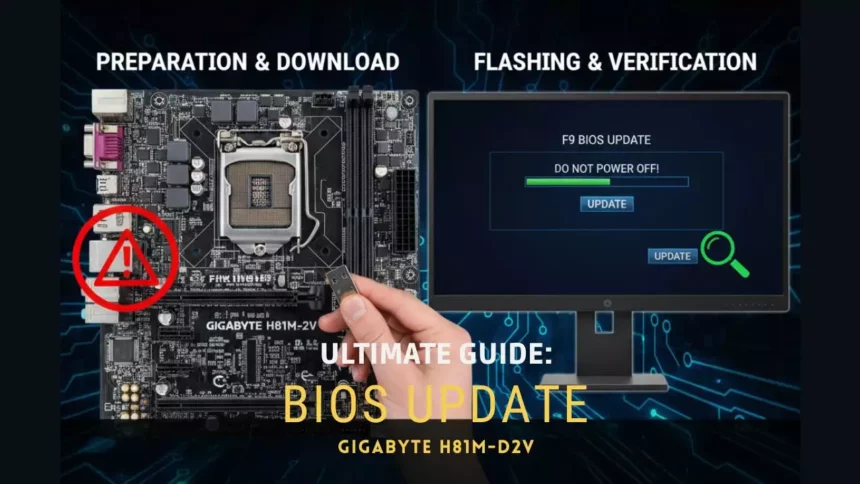
In this guide, we’ll dive deep into the step-by-step process of updating your BIOS, drawing from best practices and real-world experiences. Whether you’re a tech enthusiast looking to squeeze more life out of your build or a professional troubleshooter, understanding the nuances of this process is essential. We’ll cover everything from identifying your motherboard’s specifics to verifying the update’s success, all while emphasizing safety to prevent potential hardware damage. Remember, while BIOS updates are generally straightforward, they carry risks if not done correctly, so always proceed with caution.
Beyond the basics, I’ll share insights on why BIOS updates matter in 2025’s evolving tech landscape. With advancements in CPU architecture and security protocols, keeping your firmware current can protect against vulnerabilities and improve energy efficiency. For instance, newer BIOS versions might include support for updated UEFI (Unified Extensible Firmware Interface) standards, which offer better boot times and enhanced security features. This guide isn’t just about following steps; it’s about empowering you to make informed decisions for your setup.
To get started, let’s explore the foundational knowledge you need. The Gigabyte H81M-D2V, released around 2014, supports Intel’s fourth-generation Core processors and is known for its reliability in entry-level gaming and office rigs. However, as technology progresses, older BIOS versions can lead to issues like boot failures or incompatible peripherals. By the end of this article, you’ll not only know how to update but also why it’s a smart move for longevity. Let’s break this down into manageable sections, ensuring you’re fully prepared before diving in.
Identifying Your Motherboard Model and Revision
Before you even think about downloading a BIOS file, the first crucial step is accurately identifying your Gigabyte H81M-D2V motherboard’s model and revision. This might seem mundane, but getting this wrong can lead to compatibility nightmares, potentially bricking your system. As someone who’s helped countless users troubleshoot hardware woes, I can’t stress enough how a simple mismatch can turn a routine update into a disaster.
To begin, you’ll need to physically inspect your motherboard. Power down your computer, unplug it from the wall, and open the case to access the board. Look for the silkscreened label or sticker on the motherboard itself, typically near the CPU socket or along the edges. For the H81M-D2V, you’ll see something like “H81M-D2V Rev. 1.0” or “Rev. 2.0.” The revision, often abbreviated as “Rev,” indicates specific hardware changes that could affect BIOS compatibility. For example, Rev. 1.0 might have different voltage regulators compared to Rev. 3.0, making it essential to match the correct BIOS file.
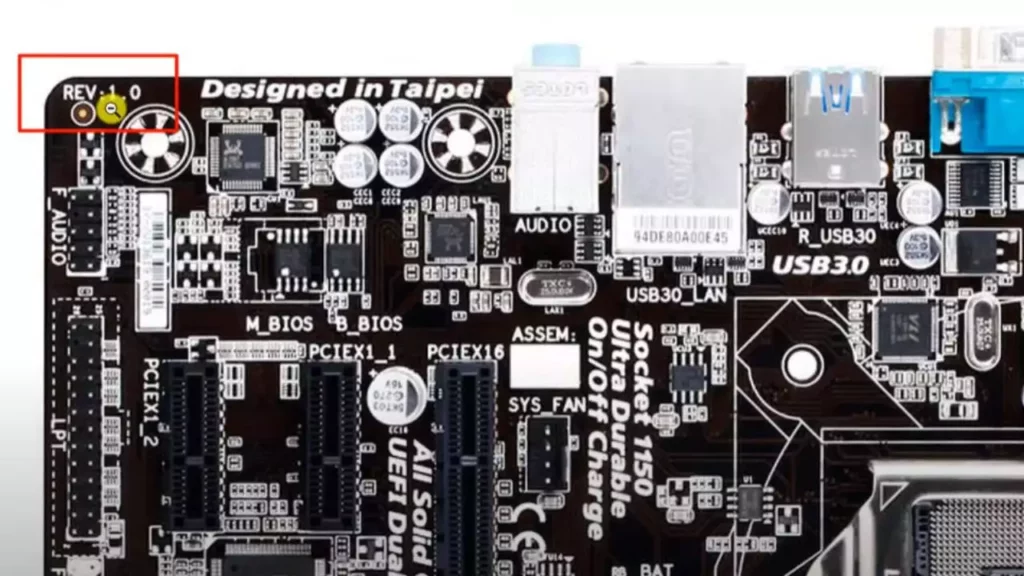
Why is this step so vital? Gigabyte releases BIOS updates tailored to each revision to address unique issues, such as fixing bugs in the power management circuitry or improving support for certain RAM modules. In 2025, with the rise of hybrid workloads and AI-driven applications, ensuring your hardware is optimized through the right firmware is more important than ever. If you’re unsure, cross-reference the serial number or use tools like CPU-Z or Gigabyte’s own diagnostic software to verify details.
Once identified, document your findings. This isn’t just about the present update; it’s about building a history for future maintenance. In my experience, users who keep detailed records avoid common pitfalls, like accidentally flashing an incompatible version. Remember, the H81M-D2V is an older board, so double-check Gigabyte’s official documentation for any discontinuation notices, as support might be limited compared to newer models.
Moving forward, let’s talk about the tools you’ll need. A stable internet connection and basic computer knowledge are assumed, but if you’re new to this, consider watching a tutorial video for visual guidance. This preparation phase sets the stage for a smooth process, reducing the anxiety that often accompanies hardware modifications.
Downloading and Verifying the Correct BIOS File
With your motherboard’s model and revision confirmed, the next phase is navigating to Gigabyte’s support resources to download the appropriate BIOS file. This step is where precision pays off, as selecting the wrong version could introduce instability or worse. Over the years, I’ve guided many through this process, and the key is treating it like a surgical procedure, meticulous and informed.
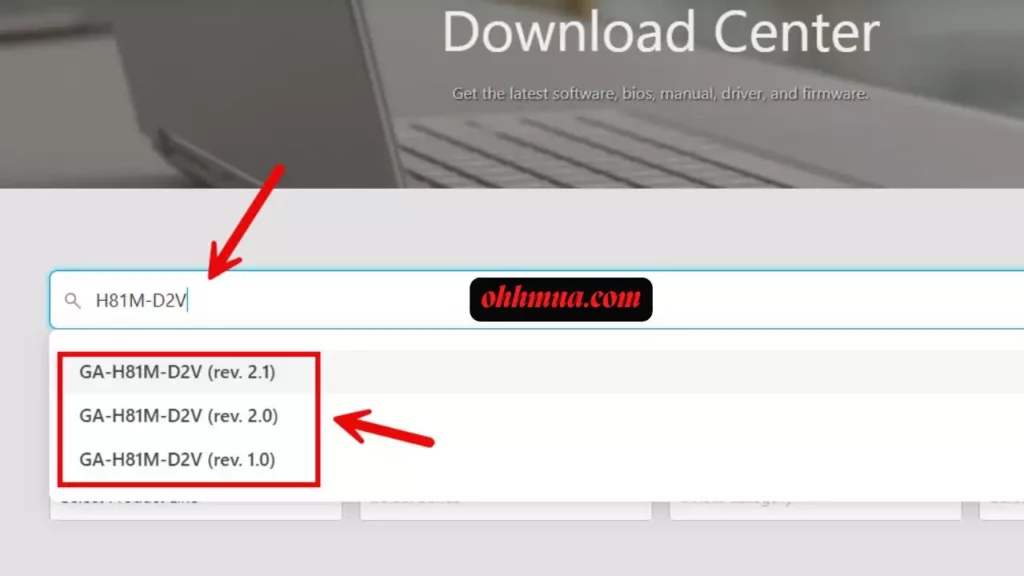
Start by visiting Gigabyte’s official website, specifically the support or downloads section. Enter “H81M-D2V” into the search bar, then select your exact revision from the dropdown options. This filters the results to show compatible BIOS files, such as F6 dated November 2015, which might include fixes for USB 3.0 stability or CPU microcode updates. Always opt for the latest version available, but verify its release notes to ensure it addresses your needs, like better support for DDR3 memory overclocking.
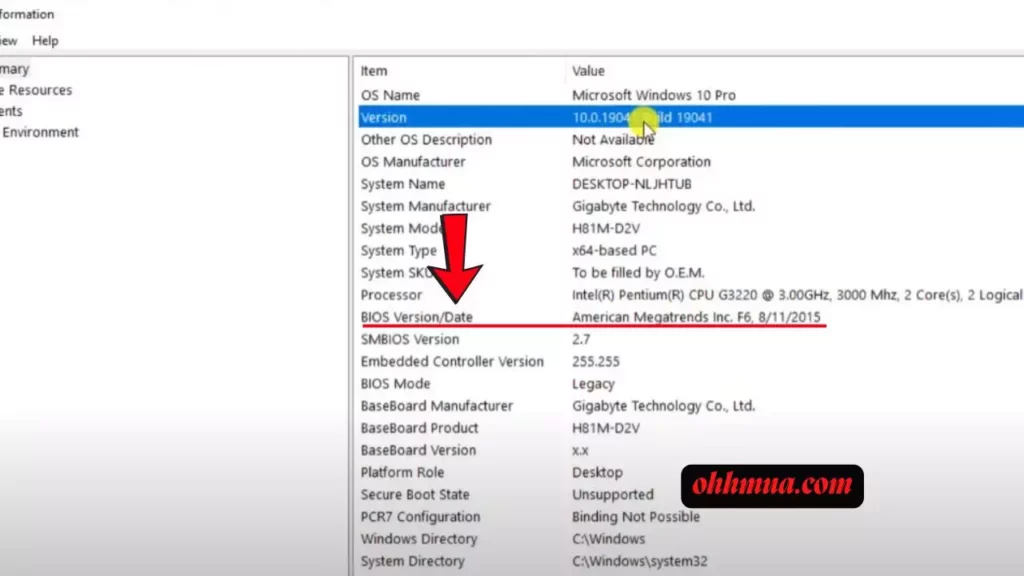
To check your current BIOS version, boot into Windows and open the System Information tool by typing “msinfo32” in the Run dialog (press Windows key + R). Under the System Summary, look for the BIOS Version/Date entry. This gives you a baseline, allowing you to compare and decide if an update is worthwhile.
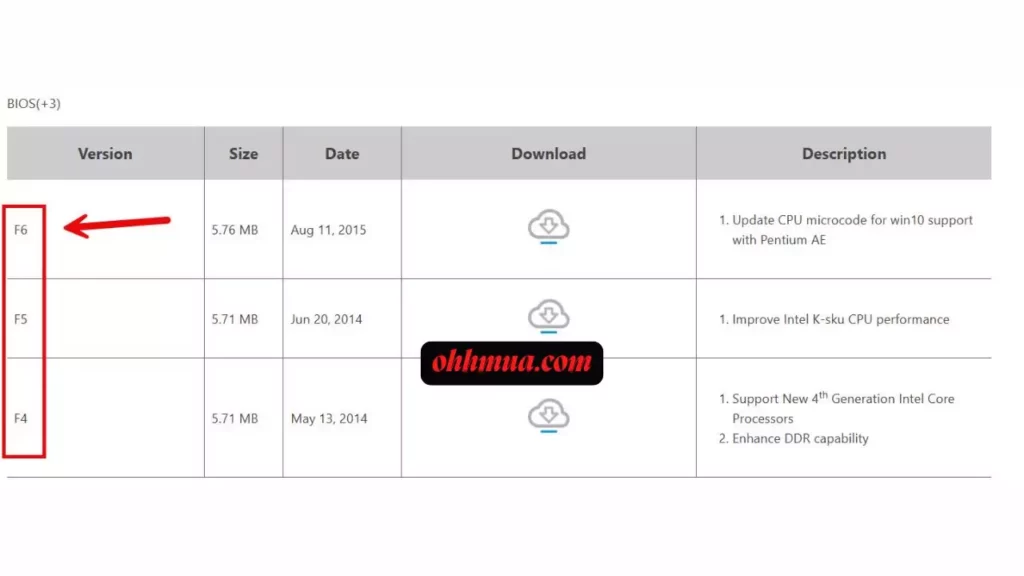
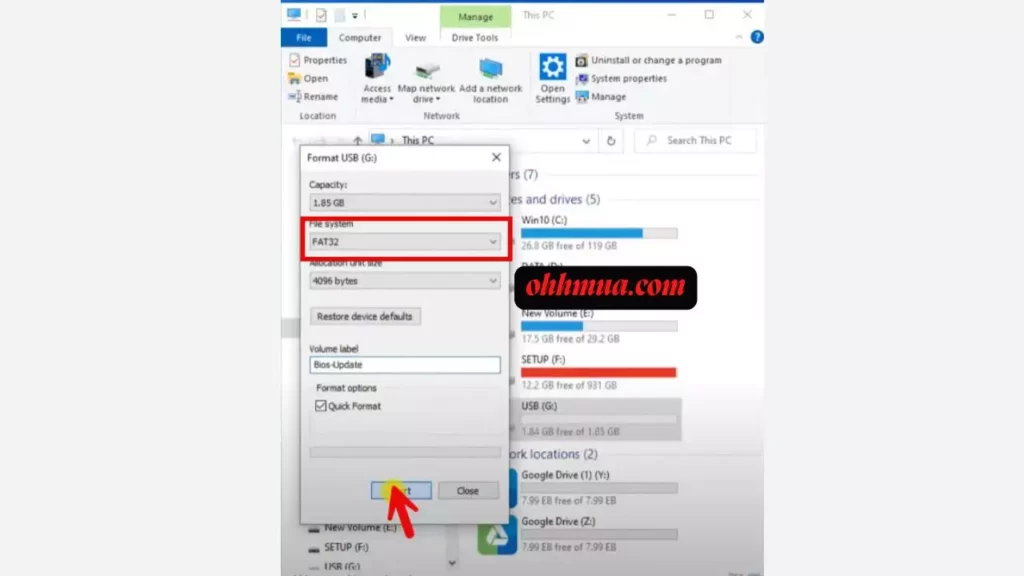
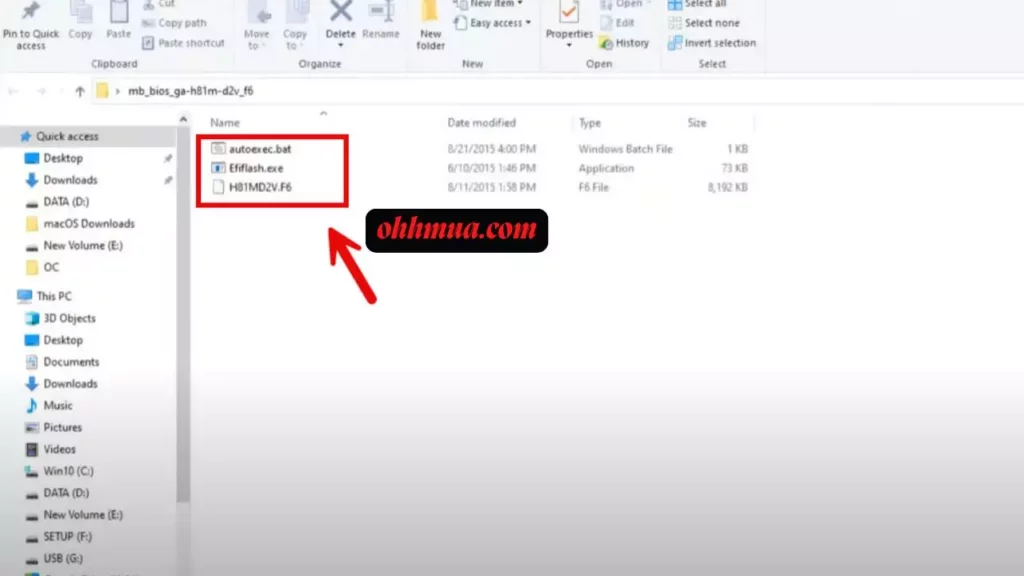
After downloading, the file will likely be in a compressed format like ZIP. Extract it to your desktop for easy access. At the same time, prepare a USB flash drive formatted to FAT32, aim for at least 1GB to hold the update file. Why FAT32? It’s a universally compatible file system that BIOS interfaces can read without issues, avoiding potential errors during the flash process.
In practice, I’ve found that verifying the file’s integrity is a game-changer. Use tools like checksum utilities to match the hash provided by Gigabyte, ensuring the download wasn’t corrupted. This extra layer of caution, especially in an era of frequent cyber threats, can save you from flashing a tampered file. Remember, the H81M-D2V’s BIOS files are specific, so resist the temptation to use generics from unofficial sources.
Preparing for the BIOS Update: Tools and Safety Measures
Preparation is the backbone of any successful BIOS update, and for the Gigabyte H81M-D2V, this means gathering the right tools and adopting safety protocols. From my extensive experience, rushing this phase often leads to regrets, so let’s take it slow and steady.
First, ensure you have a reliable USB drive ready, as mentioned earlier. Format it to FAT32 using Windows’ built-in tools, right-click the drive, select Format, and choose the file system. Copy the extracted BIOS file (usually with a .F6 extension) onto this drive, making sure it’s in the root directory for easy access. Additionally, back up your important data; while a BIOS update shouldn’t affect your storage, it’s always wise to have a fallback.
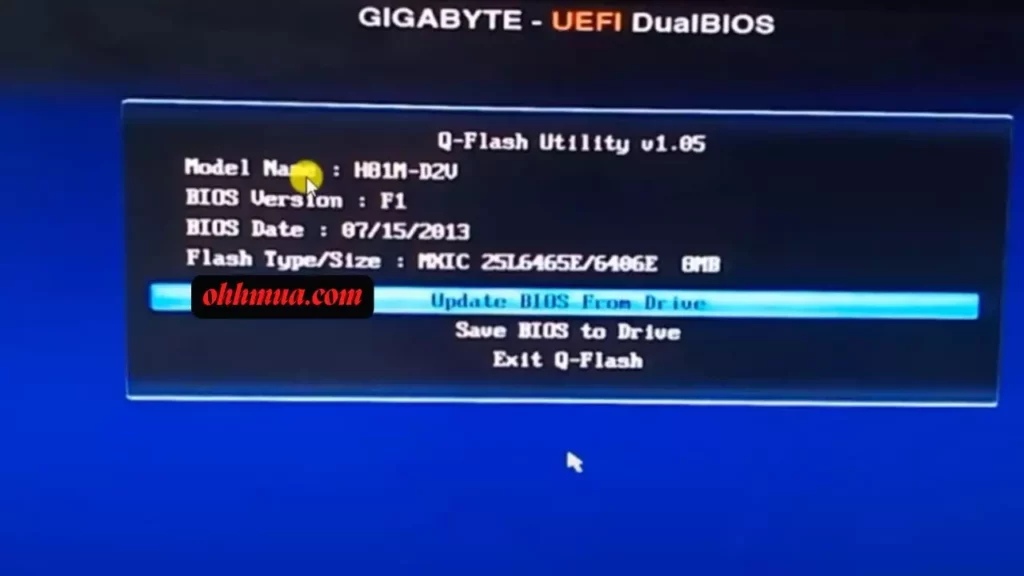
One of the most critical steps is backing up your current BIOS using Gigabyte’s Q-Flash utility. This feature, accessible from the BIOS setup menu, allows you to save a copy of your existing firmware to the USB drive. In case something goes wrong, you can restore it, potentially saving your motherboard from permanent damage. I’ve seen scenarios where power fluctuations during updates rendered boards unusable, underscoring the importance of this safeguard.
From a broader perspective, consider the environmental factors. Work in a well-ventilated area to avoid static electricity buildup, which can zap sensitive components. Ground yourself by touching a metal object or using an anti-static wrist strap. This might sound like overkill for an older board, but it’s a best practice that applies universally.
Performing the BIOS Update Step by Step
Now that you’re fully prepared, it’s time to execute the BIOS update on your Gigabyte H81M-D2V. This is the moment where all your groundwork pays off, but remain vigilant, it’s like defusing a bomb; one wrong move, and things could go south.
Insert the prepared USB drive into a rear USB port on your motherboard for better stability. Restart your computer and enter the BIOS setup by pressing the END key (or F2, depending on your setup) during boot. Navigate to the Q-Flash menu, typically under the tools or advanced section. Select the option to update Bios From Drive, then choose the correct file from the list.
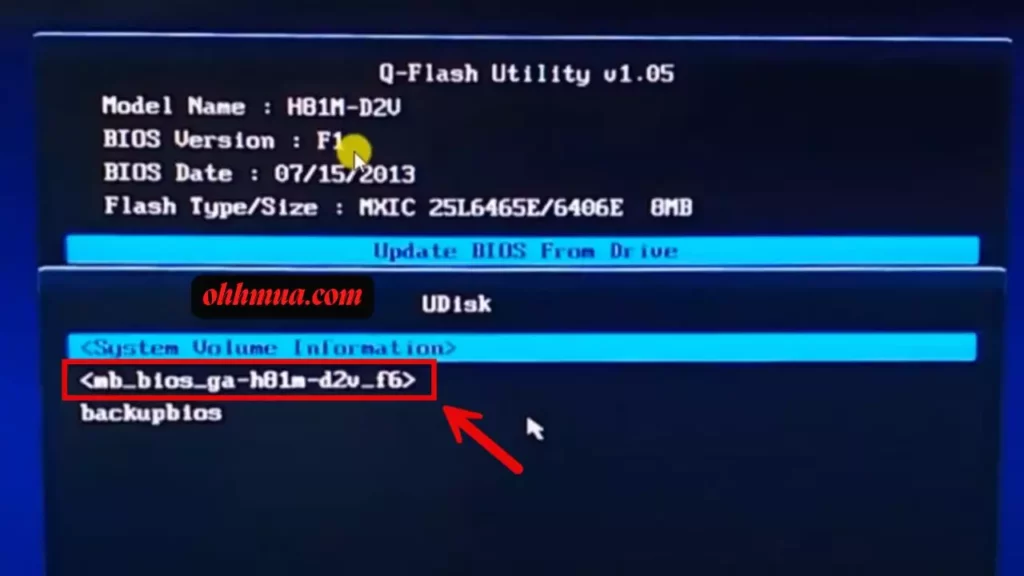
The process itself is quick, usually under a minute, but don’t be tempted to rush. Once you confirm the update, the system will flash the new BIOS and automatically restart. During this time, absolutely do not interrupt the power or press any keys; doing so could corrupt the firmware and render your motherboard inoperable. I’ve counseled users through recovery modes after such mishaps, and it’s not pretty.
Post-update, your computer will boot into the new BIOS environment. If everything goes smoothly, you’ll notice improved performance or resolved issues, like better compatibility with modern peripherals. For the H81M-D2V, updates might enhance support for higher RAM speeds or fix legacy boot problems, making it relevant even in 2025’s tech scene.
In my expert opinion, practicing on a secondary system first can build confidence, especially if this is your first time. Always refer to Gigabyte’s user manual for any model-specific instructions, as variations exist.
Verifying the Update and Troubleshooting Common Issues
After the update, verification is key to ensuring everything is in order. For the Gigabyte H81M-D2V, this involves a few straightforward checks that can save you headaches down the line.
Boot into your system and immediately enter the BIOS setup again by pressing Delete or F2. Look for the version number in the main information page, it should match the one you downloaded, like F6 from 2015. Alternatively, run msinfo32 in Windows to confirm. If it doesn’t match, you might need to troubleshoot, starting with rechecking your USB drive’s contents.
Common issues include boot loops or error messages, often due to power interruptions or incorrect files. In such cases, if you backed up your old BIOS, use Q-Flash to revert. For more persistent problems, consult Gigabyte’s forums or support chat, providing detailed system specs for accurate advice. In 2025, AI-driven diagnostics tools can help identify issues faster, but for older hardware like the H81M-D2V, manual checks are still reliable.
Troubleshooting extends to testing components post-update. Run stress tests with tools like Prime95 to ensure stability, and monitor temperatures with HWMonitor. If you encounter errors, they could stem from incompatible hardware, so double-check your CPU and RAM compatibility.
Finally, celebrate your success by exploring new BIOS features, like adjusted fan curves for better cooling. This step reinforces the value of updates in maintaining a robust system.
Best Practices and Long-Term Maintenance for Your Motherboard
Regularly monitor your system’s health using software like Gigabyte’s EasyTune, which can alert you to potential BIOS issues. Keep your operating system and drivers updated, as they interact closely with firmware. For the H81M-D2V, this means checking for Windows patches that complement BIOS changes.
Consider the broader context: environmental factors like dust buildup can affect performance, so clean your hardware periodically. In a world leaning towards sustainable tech, extending your motherboard’s life through updates reduces e-waste.
In conclusion, updating your BIOS is a powerful tool in your arsenal, blending technical skill with careful planning. By following this guide, you’ve not only safeguarded your system but also optimized it for future challenges.
Frequently Asked Questions
What is BIOS and why update it?
BIOS is the firmware that initializes your hardware on startup. Updating it fixes bugs, improves compatibility, and adds features, ensuring your system runs smoothly and securely.
Can a BIOS update damage my motherboard?
Yes, if interrupted, but following proper steps minimizes risks. Always back up first to restore if needed, making the process generally safe with precautions.
How often should I update my BIOS?
Only when necessary, like for specific issues or new hardware support. Check for updates quarterly, but avoid unnecessary ones to prevent potential instability.
Is the H81M-D2V still supported in 2025?
Gigabyte may have limited support for older models, so verify on their site. Updates are rare, but available ones can extend usability if your system meets criteria.
What if my BIOS update fails?
Try restoring from a backup using Q-Flash. If that fails, seek professional help or contact Gigabyte support for recovery options specific to your revision.
Do I need advanced tools for BIOS updates?
No, basic tools like a USB drive suffice for most updates. Ensure a stable environment, and use official software to keep things straightforward and safe.

Hi, I’m Nghia Vo: a computer hardware graduate, passionate PC hardware blogger, and entrepreneur with extensive hands-on experience building and upgrading computers for gaming, productivity, and business operations.
As the founder of Vonebuy.com, a verified ecommerce store under Vietnam’s Ministry of Industry and Trade, I combine my technical knowledge with real-world business applications to help users make confident decisions.
I specialize in no-nonsense guides on RAM overclocking, motherboard compatibility, SSD upgrades, and honest product reviews sharing everything I’ve tested and implemented for my customers and readers.

