If you’re planning to create a website or blog, WordPress is the go-to platform for beginners and experts alike. With its user-friendly interface, robust features, and endless customization options, WordPress powers over 40% of the web. But before you can start designing your site, you need to install WordPress on your hosting account.
In this beginner-friendly guide, we’ll walk you through the step-by-step process of installing WordPress on cPanel, making it easy for you to get started without any technical expertise. Whether you’re launching a personal blog or a business website, this guide will provide you with the tools you need to get WordPress up and running on your cPanel hosting environment.
Let’s dive into the installation process, and get your site live in no time!
What You’ll Need Before Starting
To set up WordPress on cPanel smoothly, ensure you have:
-
A hosting account with cPanel access.
-
A domain name pointed to your hosting.
-
A web browser (e.g., Chrome, Firefox).
-
A stable internet connection.
-
Log into your hosting provider’s control panel where your domain is currently managed.
-
Locate the DNS settings or DNS management section.
-
Change the A record for your domain to point to the new IP address provided by Porkpun. In this case, you can use the IP
103.15.222.22for bothyourdomain.comandwww.yourdomain.com. -
Save your changes, and allow time for DNS propagation, which may take up to 24 hours.
In this example, the domain provider Porkpun is used.
Example DNS Records
For reference, here are the DNS records we’ll work with:
-
Type: A
-
Host: bestergochairs.com
-
Answer: 103.15.222.22
-
TTL: 600
-
Type: A
-
Host: www.bestergochairs.com
-
Answer: 103.15.222.22
-
TTL: 600
To point your domain from your hosting provider
Step-by-Step Guide to Installing WordPress on cPanel
Step 1: Log in to cPanel
-
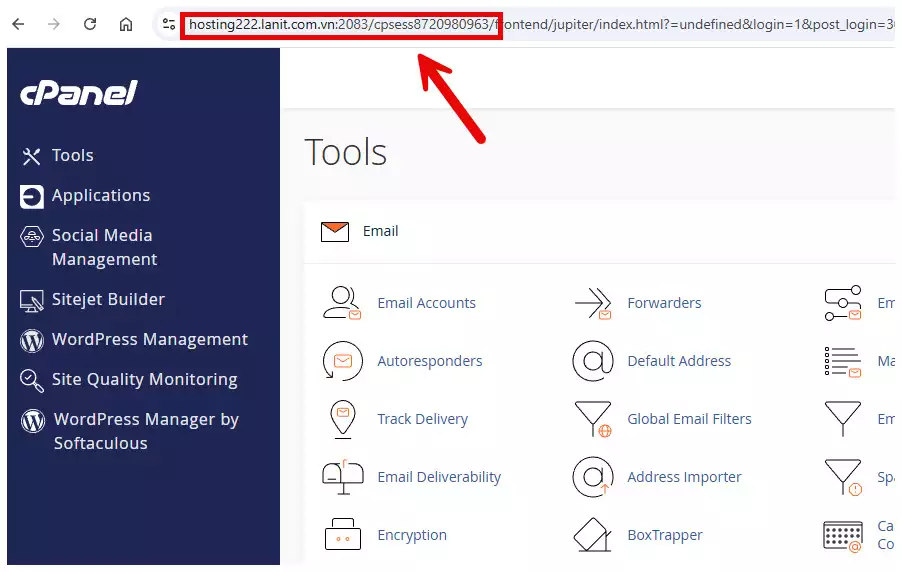
Head to your cPanel login page, usually found at yourdomain.com/cpanel or yourdomain.com:2083. Your hosting provider will have sent you this link.
cpanel login -
Enter your cPanel username and password, then click Log in.
Step 2: Locate the WordPress Installer
-
In the cPanel dashboard, scroll to the Applications or Software section.
-
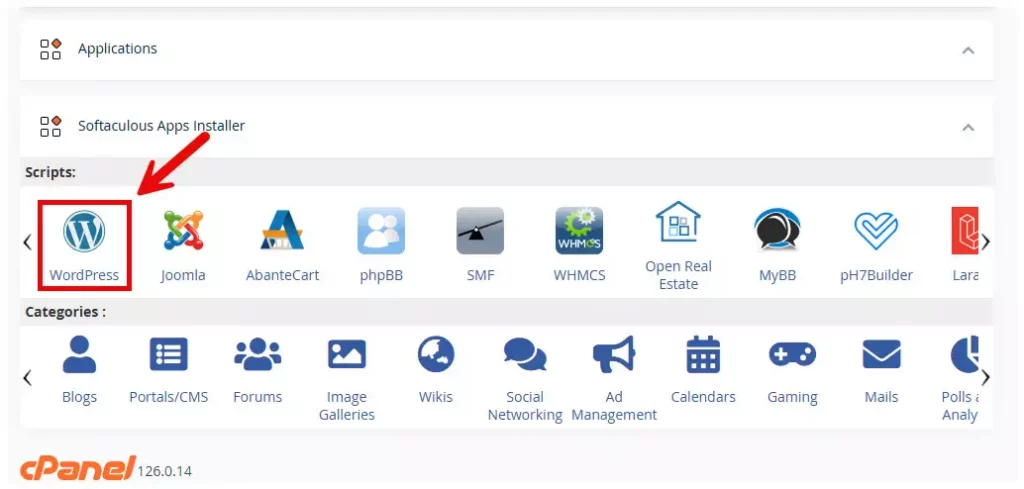
Look for Softaculous Apps Installer (or WordPress Manager, depending on your host).
-
Click on Softaculous, then find WordPress in the app list or search for it using the search bar.
install wordpress on cpanel
Step 3: Start the WordPress Installation
-
Click the Install Now or Install button on the WordPress page in Softaculous.
-
Fill out the installation details:
Software Setup
-
Choose Protocol: Select https:// if you have an SSL certificate (highly recommended for SEO and security) or http:// if not.
-
Choose Domain: Pick the domain where you want to install WordPress.
-
In Directory: Leave this blank to install WordPress at your domain’s root (e.g., yourdomain.com). If you want it in a subdirectory (e.g., yourdomain.com/blog), enter the folder name (e.g., blog).
install wordpress software setup
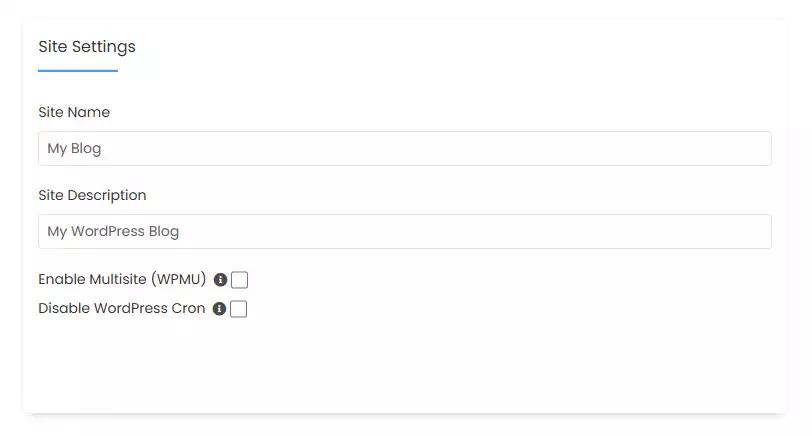
Site Settings
-
Site Name: Add a catchy name for your blog (e.g., “My Awesome Blog”).
-
Site Description: Write a short tagline or description for your site.
-
Enable Multisite: Leave unchecked unless you’re creating a network of sites.
install wordpress site settings
Admin Account
-
Admin Username: Choose a unique username (avoid “admin” for security).
-
Admin Password: Use a strong password with a mix of uppercase, lowercase, numbers, and special characters.
-
Admin Email: Enter your email for notifications and password resets.
install wordpress admin account
Additional Options
-
Select Language: Choose your preferred language (e.g., English).
-
Select Theme: Pick a theme if you want, or skip this to choose one later.
-
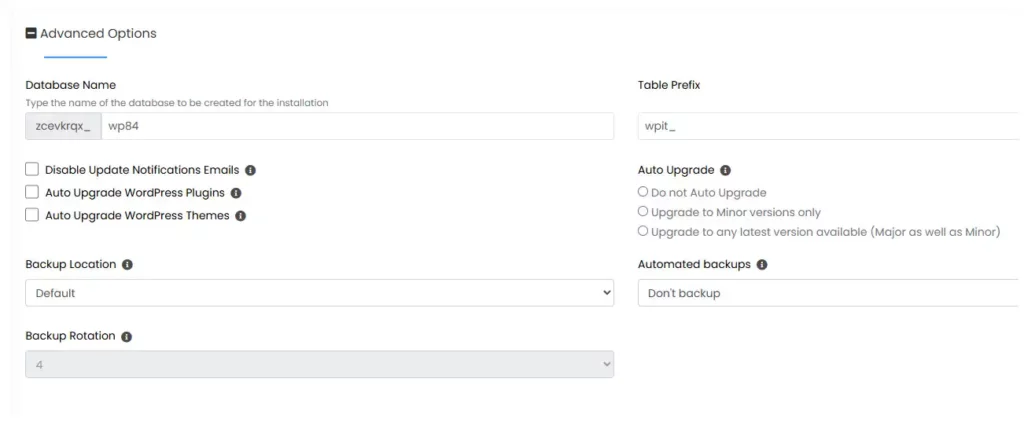
Advanced Options: You can skip this, but feel free to customize the database name or enable auto-updates for convenience.
install wordpress advanced options
-
-
Hit Install to kick off the process.
Step 4: Complete the Installation
-
Wait a minute or two for Softaculous to finish setting up WordPress.
-
Once done, you’ll see a confirmation with two key links:
-
Website URL: Your blog’s address (e.g., https://yourdomain.com).
-
Admin URL: The login page for managing your blog (e.g., https://yourdomain.com/wp-admin).
-
-
Save your admin username and password somewhere secure.
Step 5: Log in and Explore Your Blog
-
Visit the Admin URL (e.g., https://yourdomain.com/wp-admin).
-
Log in with your username and password.
-
Welcome to your WordPress dashboard! From here, you can customize your blog, install themes, add plugins, and start creating posts.
SEO and Security Tips to Boost Your Blog
To help your WordPress blog succeed, here are some tips:
-
Add an SEO Plugin: Install Yoast SEO or Rank Math to optimize your content for search engines.
-
Use a Security Plugin: Protect your site with plugins like Wordfence or iThemes Security.
-
Set Up Regular Backups: Use a plugin like UpdraftPlus or your host’s backup tool to keep your data safe.
-
Stay Updated: Keep WordPress, themes, and plugins up to date for security and performance.
-
Secure Your Password: Always use a strong, unique password for your admin account.
Troubleshooting Common Issues
-
Database Connection Error: Check the database details in the wp-config.php file or reach out to your hosting provider for assistance.
-
500 Internal Server Error: Delete the .htaccess file in your WordPress directory, then go to Settings > Permalinks in WordPress to recreate it.
-
Site Not Displaying: Confirm your domain is properly pointed to your hosting, and DNS has propagated (this may take up to 24 hours).
How to Install SSL on cPanel
To install SSL on cPanel, follow these steps:
-
Access cPanel: First, log into your cPanel account.
-
Locate SSL/TLS: In cPanel, find the “Security” section and select “SSL/TLS.” This is where you can manage SSL certificates for your domains.
install SSL -
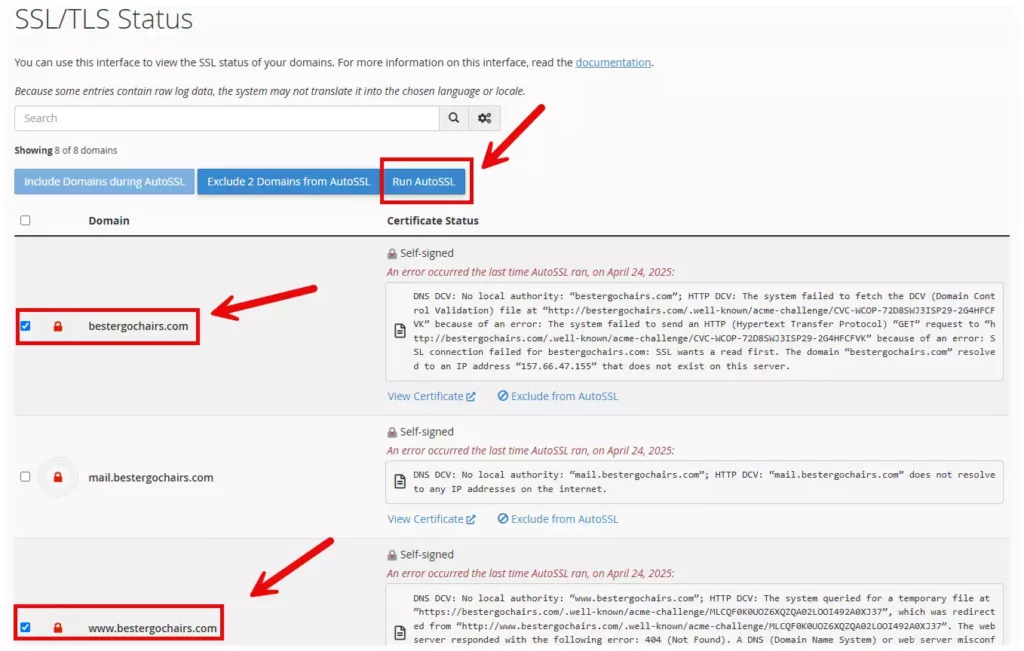
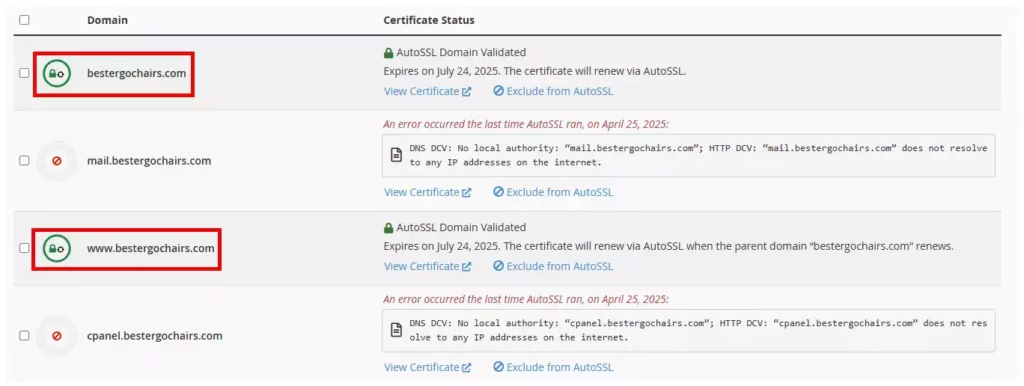
Check SSL/TLS Status: In the “SSL/TLS Status” section, you’ll see a list of your domains and their SSL certificate statuses. Domains will show statuses like “Self-signed” or “AutoSSL Domain Validated.”
-
Run AutoSSL: If your domain’s SSL certificate is not automatically issued, you can click “Run AutoSSL” to install the SSL certificate for that domain. Ensure you select the correct domain and run the AutoSSL process as shown in the image (step 2).
Run autoSSL -
Troubleshoot Errors: If you encounter an error message (such as not finding the DNS server or failing domain validation), you need to check the DNS configuration of those domains to ensure they are correctly pointing to your server. For example, you might see the error “DNS DCV: No local authority,” as shown in the image.
-
Verify the Certificate: After SSL is successfully installed, you can verify the status of the SSL certificate through cPanel. If the status shows “AutoSSL Domain Validated,” it means the certificate has been issued and is functioning properly.
SSL Status Enable
By following these steps, you’ll easily be able to install and verify SSL certificates on your domains in cPanel.

Hi, I’m Nghia Vo: a computer hardware graduate, passionate PC hardware blogger, and entrepreneur with extensive hands-on experience building and upgrading computers for gaming, productivity, and business operations.
As the founder of Vonebuy.com, a verified ecommerce store under Vietnam’s Ministry of Industry and Trade, I combine my technical knowledge with real-world business applications to help users make confident decisions.
I specialize in no-nonsense guides on RAM overclocking, motherboard compatibility, SSD upgrades, and honest product reviews sharing everything I’ve tested and implemented for my customers and readers.





![The detailed guide to installing a second SSD in your computer [Full A Z]](https://ohhmua.com/wp-content/uploads/2020/08/The-detailed-guide-to-installing-a-second-SSD-in-your-computer-Full-A-Z.webp)


