
Upgrading to a new CPU can significantly boost your PC’s performance, but ensuring compatibility with your existing motherboard is essential to avoid issues. Intel 14th gen CPUs, such as the Core i9-14900K and i7-14700K, use the LGA 1700 socket, the same as 12th and 13th gen CPUs, and are designed for motherboards with 600 Series and 700 Series chipsets. However, many motherboards may require a BIOS update to support these CPUs, especially if manufactured before their release. This guide will walk you through the process step by step, ensuring you have all the information needed for a smooth upgrade.

6 Easy Steps to Check Your Motherboard Compatibility
Step 1: Identify Your Motherboard
Before checking compatibility, you need to know your motherboard’s model. Here are several methods to find this information:
- Using System Information Tools: On Windows, press Windows key + R, type msinfo32, and hit Enter. Under “System Summary,” look for “BaseBoard Manufacturer” and “BaseBoard Model.” This is a quick, non-invasive way to get the details without opening your PC.
- Physical Inspection: If you’re comfortable, open your PC case and look for the model number printed on the motherboard. This is often found near the CPU socket or on the edge of the board.
- Software Utilities: Tools like CPU-Z provide detailed hardware information, including motherboard manufacturer and model, under the “Mainboard” tab. These tools are free and widely used by PC enthusiasts.
Identifying your motherboard is the first step to ensure you’re checking the right model for compatibility.
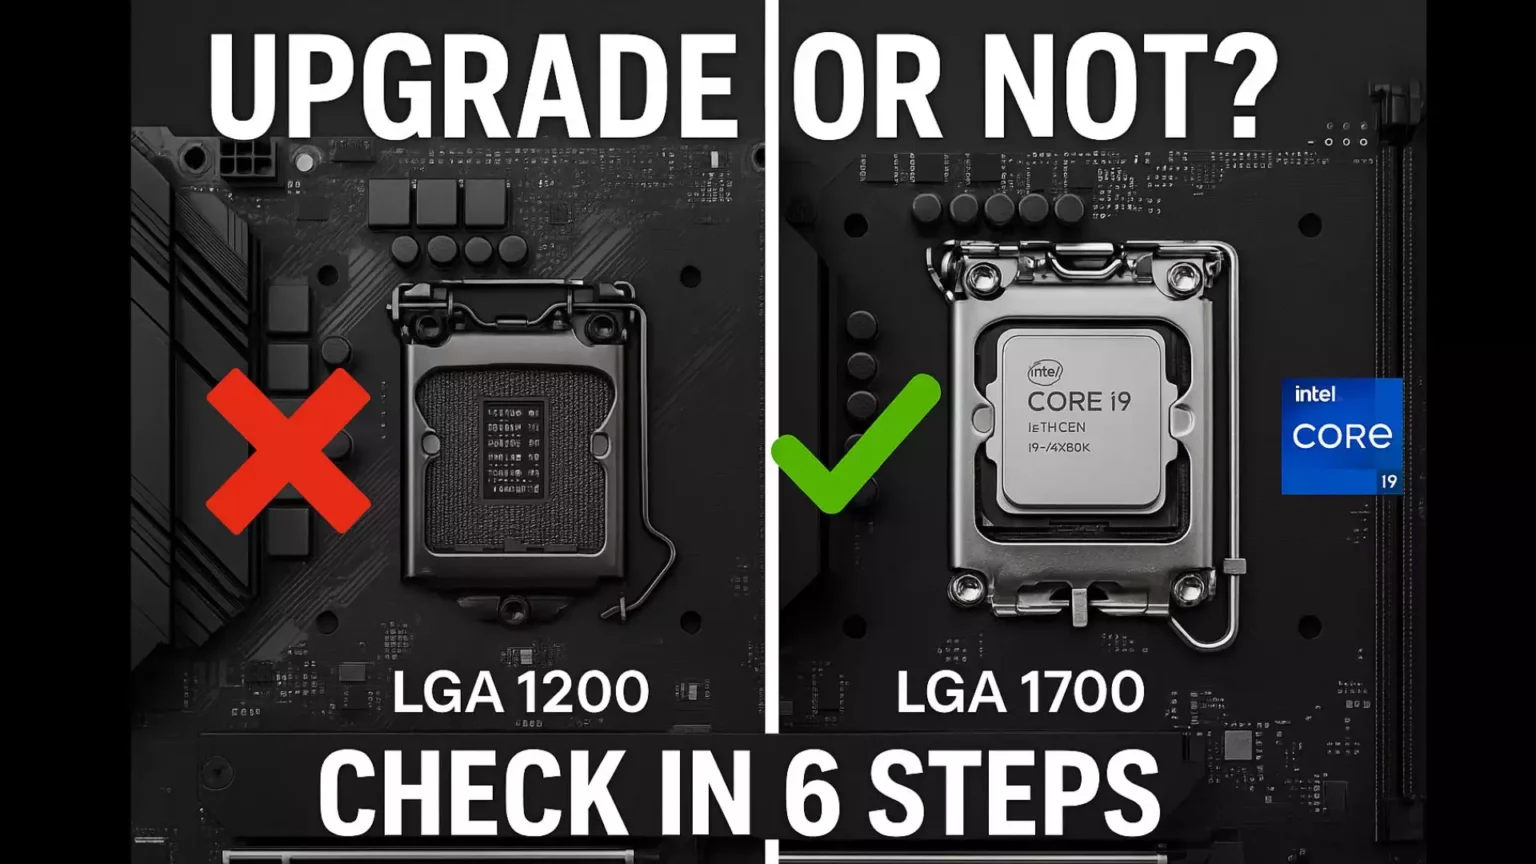
Step 2: Check the Socket Type
Intel 14th gen CPUs use the LGA 1700 socket, which is the same as 12th and 13th gen CPUs. This means if your motherboard has a different socket, such as LGA 1200 (used for 10th and 11th gen) or older sockets like LGA 1151, it won’t support 14th gen CPUs. To confirm:
- Check the motherboard specifications on the manufacturer’s website or in the user manual, which should list the socket type.
- If you’re unsure, tools like CPU-Z will also display the socket type under the “CPU” tab.
This step is crucial, as socket incompatibility is a hard barrier to compatibility.


Step 3: Determine the Chipset
The chipset determines which CPUs the motherboard can support. Intel 14th gen CPUs are compatible with motherboards based on Intel 600 Series and 700 Series chipsets, such as:
- Z790, Z690 (high-end, often for overclocking)
- B760, H770 (mid-range, for general use)
- Other variants like W680 for workstations
According to Intel’s official documentation, these chipsets support 14th gen CPUs, but older chipsets like 500 Series (e.g., Z590, B560), 400 Series, 300 Series, 200 Series, and 100 Series are not compatible. To find your chipset:
- Look at the motherboard model name, which often includes the chipset (e.g., ASUS ROG Strix Z790-E).
- Check the specifications on the manufacturer’s website, where the chipset is listed under “Chipset” or “Platform.”
This step ensures your motherboard is from the right generation to potentially support 14th gen CPUs.
Step 4: Visit the Manufacturer’s Website
With your motherboard model and chipset confirmed, visit the official website of the manufacturer (e.g., ASUS, MSI, Gigabyte, ASRock). Navigate to the support section or the product page for your specific model. Here’s what to do:
- Check the CPU Support List: Look for a section titled “CPU Support List,” “Supported Processors,” or similar. This list should include all CPUs tested and confirmed to work with your motherboard. If Intel 14th gen CPUs (e.g., Core i9-14900K, i7-14700K) are listed, your motherboard supports them, possibly with a BIOS update.
- Check for BIOS Updates: If 14th gen CPUs aren’t listed, check the BIOS updates section. Manufacturers often release new BIOS versions to add support for newer CPUs. Look for release notes that mention “support for 14th gen Intel CPUs” or similar. For example, Gigabyte and ASUS have issued BIOS updates for their Z790 and B760 motherboards to include 14th gen support.
This step is critical, as many motherboards released before October 2023 may not have initial support but can be updated.
Step 5: Update the BIOS (If Necessary)
If your motherboard requires a BIOS update to support 14th gen CPUs, follow these steps carefully to avoid damaging your hardware:
- Download the Latest BIOS: Go to the manufacturer’s website and download the BIOS file for your motherboard. Ensure it’s the version that supports 14th gen CPUs, as confirmed by the release notes.
- Prepare a USB Drive: Format a USB drive to FAT32 and copy the BIOS file to the root directory. This ensures compatibility with the BIOS flashing utility.
- Enter BIOS Update Mode: The process varies by manufacturer, but typically, you’ll need to enter the BIOS setup by pressing a key like F2, Delete, or Esc during boot. Look for a “BIOS Flash” or “EZ Flash” utility within the BIOS interface.
- Follow Instructions: Select the BIOS file from the USB drive and follow the on-screen instructions to flash the BIOS. Do not interrupt the process, as it can brick your motherboard, rendering it unusable.
Important Note: Some motherboards have a feature like “BIOS Flashback” (ASUS), “Q-Flash Plus” (Gigabyte), or similar, which allows you to update the BIOS without a CPU installed. This is particularly useful if you’re planning to upgrade to a 14th gen CPU and your current setup doesn’t support it out of the box. Check the manufacturer’s website for details on whether your motherboard has this feature.
Step 6: Verify Compatibility
After updating the BIOS (if needed), double-check that your motherboard now supports 14th gen CPUs:
- Revisit the manufacturer’s website to confirm the CPU support list has been updated to include 14th gen models.
- Use online tools for additional verification:
- Intel’s Product Compatibility Tool : Enter your processor details to find compatible motherboards, though this is more useful for selecting new hardware.
- PCPartPicker : Add your motherboard and a 14th gen CPU to your build list; it will flag any compatibility issues, often noting if a BIOS update is required.
This step ensures you’ve covered all bases before proceeding with the upgrade.
Additional Considerations and Tips
While the above steps cover the essentials, here are some additional factors to consider for a successful upgrade:
- Power Supply and Cooling: Intel 14th gen CPUs, especially high-end models like the Core i9-14900K, have high power draw and can generate significant heat. Ensure your power supply unit (PSU) meets the CPU’s requirements, typically listed in the CPU specifications. Also, check that your cooling solution (air cooler, AIO, etc.) is adequate, as insufficient cooling can lead to thermal throttling or system instability.
- Memory Compatibility: Intel 14th gen CPUs support both DDR4 (up to 3200 MT/s) and DDR5 (up to 5600/4800 MT/s) memory. Check your motherboard’s specifications to see which types it supports and ensure your RAM meets the speed and capacity requirements for optimal performance.
- Out-of-the-Box Support: Some newer motherboards, particularly those launched specifically for 14th gen, may support these CPUs without a BIOS update. For example, Gigabyte’s Aorus X series (e.g., Z790-AORUS-ELITE-X) has been noted to support 14th gen out of the box. Always check the manufacturer’s CPU support list to confirm, as this can vary by model and manufacturing date.
- Manufacturing Date and BIOS Version: Most Z790 and B760 motherboards manufactured before October 2023 will require a BIOS update to support 14th gen CPUs, as they were initially designed for 12th and 13th gen. There’s no easy way to know the manufacturing date, so it’s safest to assume a BIOS update is needed unless the motherboard is very recent or explicitly states out-of-the-box support.
Practical Examples and User Experiences
User discussions, such as those on Reddit, highlight that many users have successfully upgraded to 14th gen CPUs by updating their BIOS on existing Z790 and B760 motherboards. For instance, some have noted that Gigabyte’s Aorus X boards support 14th gen out of the box, while others have used the BIOS Flashback feature to update older motherboards like the Z690 Velocita without a CPU. These experiences underscore the importance of checking the manufacturer’s website and ensuring you have the right tools, like a FAT32 USB drive, for BIOS updates.
Who Should Upgrade ?
Gamers:
-
If you’re using 12th or 13th gen Intel CPUs (e.g. i5-12600K, i7-13700K), upgrading to 14th gen offers minimal performance gains (5-10%), mostly not worth the cost unless you want the latest hardware for futureproofing.
-
If you’re on 10th or 11th gen CPUs (e.g. i7-10700K, i5-11400), upgrading to 14th gen can deliver 10-30% FPS improvements depending on the game, especially open world titles or CPU-intensive competitive games.
Content Creators and Professionals:
-
Users working with video editing, 3D rendering, CAD, or heavy multitasking will benefit noticeably from upgrading to a higher core count 14th gen CPU like the i7-14700K or i9-14900K, reducing export and render times significantly.
General Users and Office Work:
-
If your current setup handles your tasks smoothly, upgrading purely for daily office work or web browsing is not necessary. Invest in an SSD or RAM upgrade if you need faster performance for general tasks.
Conclusion
Checking if your motherboard supports Intel 14th gen CPUs involves identifying your motherboard model, confirming the LGA 1700 socket and 600/700 Series chipset, and ensuring the BIOS is up to date. By following these steps, you can confidently upgrade to the latest Intel processors, enjoying enhanced performance for gaming, content creation, and more. Always refer to official manufacturer websites and tools like Intel’s Product Compatibility Tool for the most accurate and up-to-date information. With careful planning, your upgrade can be seamless and trouble-free.
FAQ
Can I use my old DDR4 RAM with a 14th gen CPU?
Yes, 14th gen CPUs support both DDR4 and DDR5, but your motherboard must also support DDR4 if you plan to reuse it.
Do I need to reinstall Windows after upgrading my CPU?
Generally no, especially if you’re only changing the CPU and keeping the same motherboard. However, it’s good practice to update chipset drivers after upgrading.
Will I need a new cooler for Intel 14th gen?
If your current cooler supports LGA 1700 and has sufficient cooling capacity (e.g. a good tower air cooler or 240mm AIO for high-end CPUs), you can reuse it. Always check thermal ratings, especially for CPUs like the i9-14900K with high power draw.
My motherboard doesn’t boot after installing the new CPU. What should I do?
You may need a BIOS update to support the new CPU. Use BIOS Flashback if your motherboard supports it, or reinstall your old CPU to update BIOS first.

Hi, I’m Nghia Vo: a computer hardware graduate, passionate PC hardware blogger, and entrepreneur with extensive hands-on experience building and upgrading computers for gaming, productivity, and business operations.
As the founder of Vonebuy.com, a verified ecommerce store under Vietnam’s Ministry of Industry and Trade, I combine my technical knowledge with real-world business applications to help users make confident decisions.
I specialize in no-nonsense guides on RAM overclocking, motherboard compatibility, SSD upgrades, and honest product reviews sharing everything I’ve tested and implemented for my customers and readers.
![The detailed guide to installing a second SSD in your computer [Full A Z]](https://ohhmua.com/wp-content/uploads/2020/08/The-detailed-guide-to-installing-a-second-SSD-in-your-computer-Full-A-Z.webp)