Google Analytics 4 (GA4) is Google’s latest analytics platform, replacing Universal Analytics since July 2023. With its event-based tracking, cross-platform insights, and AI-driven predictions, GA4 is a must-have tool for optimizing your website. This guide walks you through installing GA4 on your website (especially WordPress) and leveraging its features effectively in 2025, with practical tips for beginners and developers alike.
Why Use Google Analytics 4?
- Cross-platform tracking: Monitor website and app data in one interface.
- Event-focused analytics: Track user actions like scrolling, clicks, or video views, not just pageviews.
- AI-powered insights: Predict user behavior, such as purchase likelihood or churn risk.
- Privacy compliance: Supports GDPR, CCPA, and other regulations with features like server-side tagging.
- Free and user-friendly: Ideal for beginners and advanced users.
Part 1: Installing Google Analytics 4
Step 1: Set Up a Google Analytics Account
- Access Google Analytics:
- Visit analytics.google.com and sign in with your Google account. Create one if needed.
- Click Start Measuring for new users.
- Create an Account:
- Enter an Account Name (e.g., your website or company name).
- Adjust Data-sharing settings (uncheck options if you’re unsure about sharing data with Google).
- Click Next.
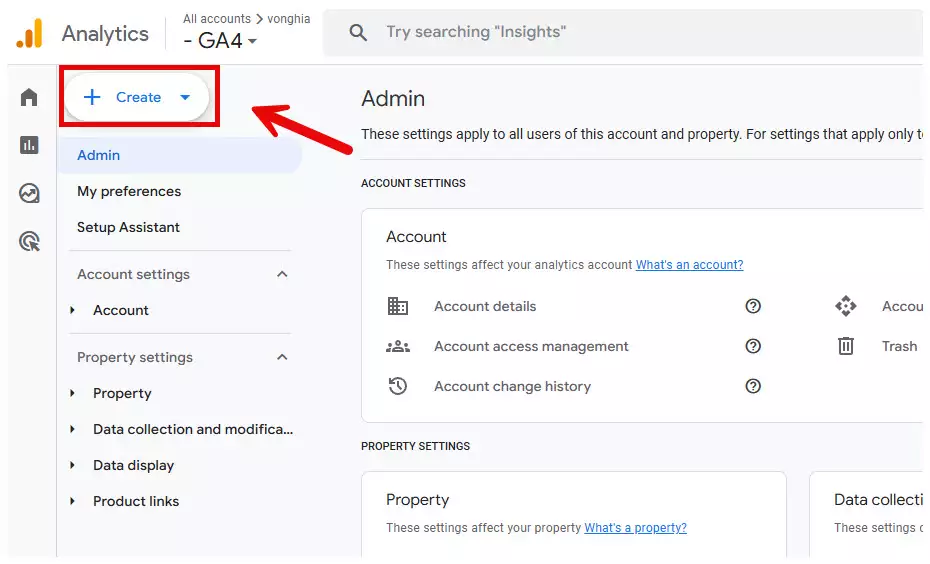
How to Install and Use Google Analytics
How to Install and Use Google Analytics 2
- Set Up a Property:
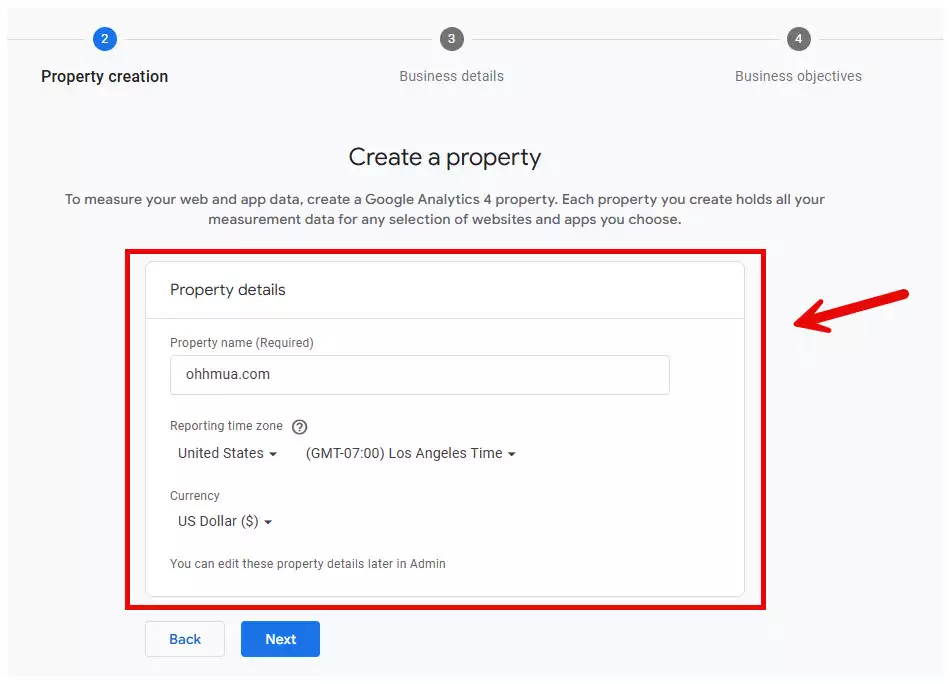
- Enter a Property Name (e.g., “OhhMua.com Website”).
Google Analytics Property creation - Select your Reporting Time Zone (e.g., GMT+7 for Vietnam) and Currency (USD or VND based on your market).
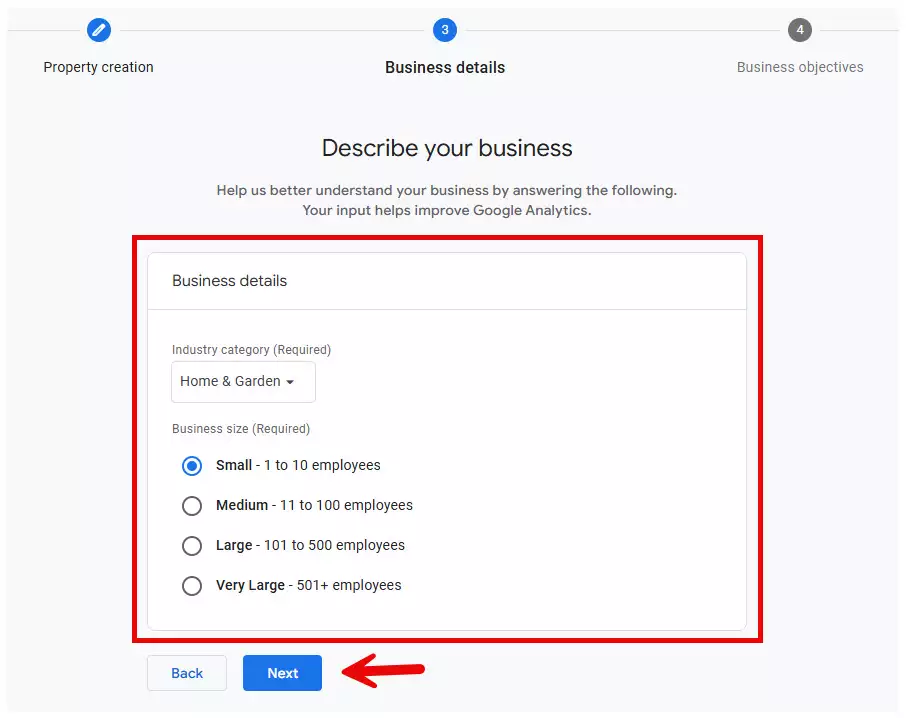
- Choose your industry and business size.
Google Analytics Business details - Click Next and accept the Terms of Service.
- Enter a Property Name (e.g., “OhhMua.com Website”).
- Create a Data Stream:
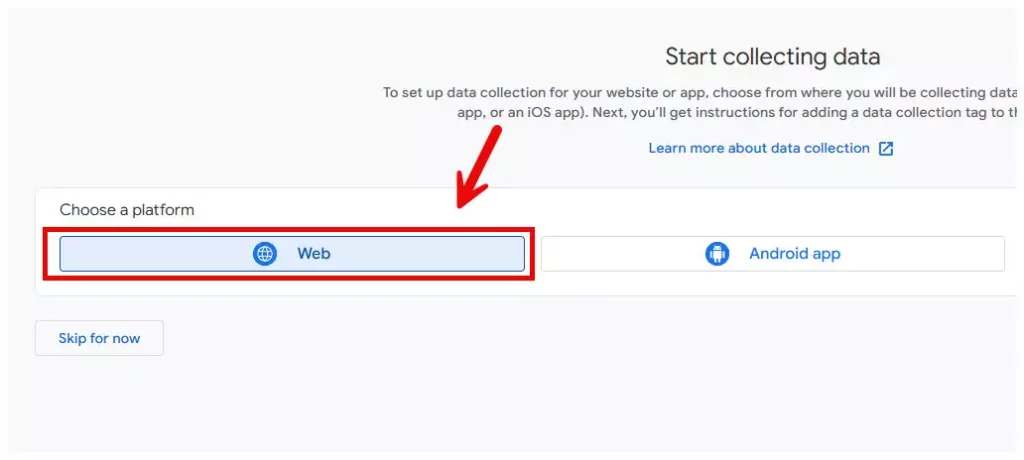
- Select Web for website tracking.
Google Analytics start collecting data - Enter your Website URL (e.g., https://ohhmua.com) and a Stream Name (e.g., “OhhMua Web Stream”).
Google Analytics set up your web stream - Enable Enhanced Measurement to auto-track events like scrolls, outbound clicks, or video views. You can disable unnecessary events later.
- Click Create Stream.
- Select Web for website tracking.
- Get the Tracking Code:
- After creating the stream, note the Google Tag ID (e.g., G-XXXXXXX) and the JavaScript code (gtag.js).
Google Analytics google tag - Copy these for use in the next steps.
- After creating the stream, note the Google Tag ID (e.g., G-XXXXXXX) and the JavaScript code (gtag.js).
Step 2: Install GA4 on Your Website
Here are three popular methods to install GA4, with a focus on WordPress:
Method 1: Using a Plugin (Best for Beginners)
Plugins like MonsterInsights or Foxtool simplify GA4 setup without coding. This is the easiest method for WordPress users.
- Install MonsterInsights:
- Go to WordPress Dashboard > Plugins > Add New.
- Search for MonsterInsights, click Install Now, and Activate.
- Use the free version for basic needs or the Pro version for advanced features (e.g., eCommerce or form tracking).
- Connect GA4:
- After activation, MonsterInsights launches a setup wizard.
- Click Connect MonsterInsights, sign in with your Google account, and select your GA4 property.
- The plugin automatically adds the tracking code to your site.
- Configure Settings:
- Navigate to Insights > Settings and enable:
- Events Tracking: Track clicks, downloads, etc.
- Affiliate Link Tracking: Monitor affiliate links (if applicable).
- Enhanced Link Attribution: Improve click accuracy.
- Save settings and expect data within 24 hours.
- Navigate to Insights > Settings and enable:
Pros: User-friendly, integrates reports into WordPress, supports advanced features.
Cons: Free version has limitations; Pro version requires a subscription.
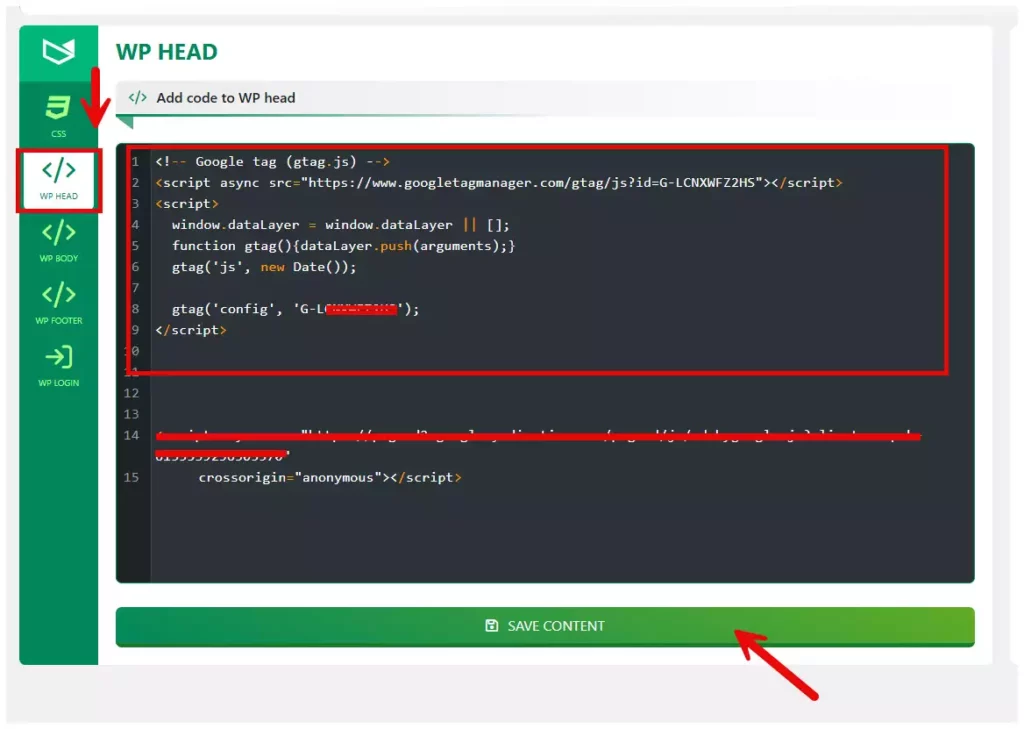
Install Foxtool:
-
Go to your WordPress Dashboard > Plugins > Add New.
-
Search for Foxtool, click Install Now, and then Activate.
-
After activation, choose Add Code > WP HEAD.
-
Paste the Google Tag code in the provided field and click SAVE CONTENT to complete the process.
Google Analytics foxtool plugin
Method 2: Manual Code Installation
Add the gtag.js code directly to your site’s source code for a lightweight solution.
- Copy the Google Tag Code:
- In GA4’s Data Stream, click View Tag Instructions > Install Manually.
- Copy the code starting with <!– Google tag (gtag.js) –>.
Google Analytics google tag
- Add to Your Website:
- Go to WordPress Dashboard > Appearance > Theme File Editor.
- Open header.php and paste the code right after the <head> tag.
- Save changes.
Google Analytics header
- Verify Setup:
- Use Google Tag Assistant (Chrome extension) or GA4’s Realtime Report to confirm data collection.
Pros: No plugin dependency, lightweight.
Cons: Requires code editing, which can lead to errors if done incorrectly.
Method 3: Using Google Tag Manager (GTM)
GTM is ideal for managing multiple tracking tags on complex websites.
- Set Up GTM:
- Visit tagmanager.google.com and create an account.
- Create a Container for your website and copy the GTM code.
- Install GTM Code:
- Add the GTM code to the <head> and <body> sections of your site (manually or via a plugin like WPCode).
- Save changes.
- Add GA4 Tag in GTM:
- In GTM, create a new Tag, select Google Analytics: GA4 Configuration.
- Enter your Measurement ID (G-XXXXXXX) from GA4.
- Set the Trigger to All Pages for site-wide tracking.
- Click Submit and Publish.
- Verify:
- Use GA4’s DebugView or GTM’s Preview Mode to ensure data is sent correctly.
Pros: Flexible, easy to manage multiple tags.
Cons: Steeper learning curve for beginners.
Step 3: Verify Installation
- Check GA4’s Realtime Report to see active user data (may take up to 30 minutes).
- Use tools like GA Checker (gachecker.com) or Google Tag Assistant to confirm the tracking code is working.
- If no data appears, ensure the code is correctly placed and no plugins (e.g., caching) are blocking it.
Part 2: Using Google Analytics 4 Effectively
1. Understand Key Reports
GA4 offers various reports to analyze website performance. Here are the essentials:
- Realtime: Shows active users, traffic sources, and events in real time. Great for monitoring live campaigns.
- Acquisition: Tracks traffic sources (organic, social, referral, paid). For example, if social media drives the most traffic, focus on those channels.
- Engagement: Monitors events (e.g., clicks, scrolls) and session duration. Use this to optimize content or user experience.
- Monetization: Tracks revenue, top products, and conversion rates for eCommerce sites.
- Demographics: Provides age, gender, and location data (requires enabling Google Signals).
Tip: Customize reports via the Customize Report option to focus on metrics like bounce rate or average session time.
2. Set Up Goals and Events
- Automatic Events: With Enhanced Measurement enabled, GA4 tracks events like page_view, scroll, or outbound_click. Disable irrelevant events in Data Stream > Enhanced Measurement.
- Custom Events:
- Go to Events > Create Event to track actions like “Buy Now” clicks or form submissions.
- Example: Create a “form_submission” event to monitor contact form completions.
- Conversions:
- Mark key events (e.g., purchase completion) as Conversions in Events > Mark as Conversion.
- Track conversion rates in the Conversions report.
Tip: Use DebugView to test events before full deployment.
3. Integrate with Other Tools
- Google Ads: Link GA4 to optimize ad campaigns based on user behavior.
- Google Search Console: Connect to track SEO performance, such as keyword rankings and click-through rates.
- Looker Studio: Build custom dashboards for visualizing GA4 data.
4. Ensure Privacy Compliance
- Consent Mode: Enable for EU, UK, or Swiss users to comply with GDPR. This ensures data collection only with user consent.
- Filter Internal Traffic: In Data Stream > Data Filters, exclude internal IP addresses for accurate data.
- Update Privacy Policy: Disclose data collection (e.g., cookies, IP addresses) in your site’s Privacy Policy.
2025 Tips for Maximizing GA4
- Leverage AI Predictions: Use metrics like purchase probability to target high-value users.
- Optimize for Mobile: With rising mobile traffic, ensure your site is mobile-friendly and track mobile user behavior.
- Focus on User Journeys: Analyze User Journey reports to improve navigation from homepage to checkout.
- Review Regularly: Every 3-6 months, check events, filters, and reports to maintain data accuracy.
Conclusion
Google Analytics 4 is a powerful tool to understand your audience and optimize your website. By installing it correctly (via MonsterInsights, manual code, or GTM) and using its reports effectively, you can boost traffic, enhance user experience, and increase conversions. Start with GA4 today to stay ahead in 2025!

Hi, I’m Nghia Vo: a computer hardware graduate, passionate PC hardware blogger, and entrepreneur with extensive hands-on experience building and upgrading computers for gaming, productivity, and business operations.
As the founder of Vonebuy.com, a verified ecommerce store under Vietnam’s Ministry of Industry and Trade, I combine my technical knowledge with real-world business applications to help users make confident decisions.
I specialize in no-nonsense guides on RAM overclocking, motherboard compatibility, SSD upgrades, and honest product reviews sharing everything I’ve tested and implemented for my customers and readers.


