RAM speed plays a critical role in system performance, particularly for tasks like gaming, video editing, and multitasking. However, most RAM modules run at default speeds (e.g., 2133 or 2400 MHz) unless configured to use their advertised speeds (e.g., 3200 MHz or higher) via XMP. XMP, developed by Intel, is a feature that allows users to easily apply pre-configured RAM settings for optimal performance. This guide will walk you through enabling XMP, ensuring compatibility, and troubleshooting potential issues, based on manufacturer documentation and user experiences.
Quick Summary
-
What is XMP? A RAM overclocking profile for higher speeds.
-
Why enable it? Boost gaming, editing, and multitasking performance.
-
How to enable? Enter BIOS > select XMP Profile > Save & Exit.
-
Risks? Potential instability if RAM/CPU/board aren’t fully compatible.

How to enable XMP
What is XMP?
XMP, or Extreme Memory Profile, is a technology that allows RAM to operate at higher speeds, timings, and voltages than the default JEDEC standards. RAM manufacturers test and certify these profiles to ensure stability at higher performance levels. For example, a DDR4 module rated at 3600 MHz may default to 2400 MHz unless XMP is enabled. AMD systems also support XMP, though it’s sometimes labeled as DOCP (Direct Overclock Profile) or A-XMP on ASUS motherboards.
Enabling XMP adjusts:
-
Frequency: Increases RAM speed (e.g., from 2400 MHz to 3600 MHz).
-
Timings: Optimizes latency settings (e.g., CAS latency).
-
Voltage: Adjusts power delivery to support higher performance (e.g., 1.35V instead of 1.2V).
Why Enable XMP?
Enabling XMP unlocks the full potential of your RAM, offering:
-
Improved Performance: Faster RAM speeds enhance gaming FPS, reduce rendering times, and improve multitasking.
-
Cost Efficiency: No need for manual overclocking, which requires advanced knowledge.
-
Stability: XMP profiles are pre-tested by manufacturers for reliability.
However, improper configuration or incompatible hardware can lead to instability, so careful setup is essential.
Step-by-Step Guide to Enable XMP
Step 1: Verify Compatibility
Before enabling XMP, ensure your hardware supports it:
-
Check RAM Specifications: Confirm your RAM supports XMP by checking the packaging, product page, or using software like CPU-Z (under the “SPD” tab). Look for XMP profiles (e.g., XMP 1.0 or 2.0) and their rated speeds.

cpuz SPD TAB -
Motherboard Support: Most modern motherboards with Intel (600/700 Series chipsets) or AMD (B550, X570, B650, X670) chipsets support XMP. Check your motherboard’s manual or manufacturer’s website for confirmation.

MSI MAG B550 Tomahawk support XMP -
CPU Memory Controller: Ensure your CPU’s integrated memory controller (IMC) supports your RAM’s speed. For example, Intel 14th gen CPUs support DDR4 up to 3200 MT/s and DDR5 up to 5600 MT/s, while AMD Ryzen 7000 series supports DDR5 up to 5200 MT/s.
Tip: Use tools like Crucial’s System Scanner (https://www.crucial.com/) or check the motherboard’s QVL (Qualified Vendor List) to confirm RAM compatibility.
Step 2: Back Up Your System
Enabling XMP modifies system settings, so back up critical data to avoid potential data loss from instability. While rare, incorrect settings can cause boot issues.
Step 3: Access the BIOS/UEFI
To enable XMP, you need to enter your motherboard’s BIOS/UEFI:
-
Restart Your PC: Power off and restart your computer.
-
Enter BIOS: During boot, press the key to access BIOS (commonly Del, F2, F10, or Esc). Check your motherboard manual or boot screen for the specific key.
-
Navigate to UEFI Mode: Modern motherboards use a graphical UEFI interface, but older ones may have a text-based BIOS.
Step 4: Locate the XMP Setting
Once in the BIOS/UEFI:
-
Find the Overclocking or Memory Settings:
-
For ASUS motherboards, look for “Ai Tweaker” or “Extreme Tweaker.”
-
For MSI, navigate to “OC” or “Overclocking.”
-
For Gigabyte, check “Tweaker” or “M.I.T.”
-
For ASRock, find “OC Tweaker” or “DRAM Configuration.”
-
-
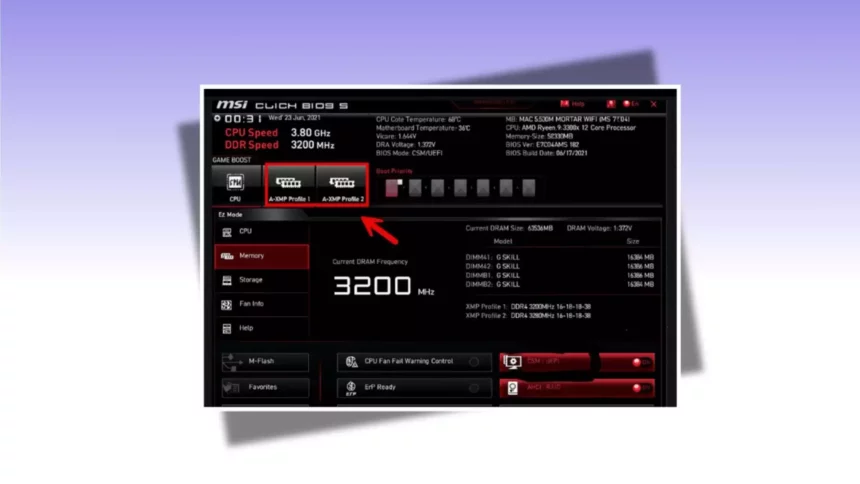
Locate XMP Option: Look for “XMP,” “Extreme Memory Profile,” or “DOCP/A-XMP.” It’s typically under memory or overclocking settings.
-
Select XMP Profile: Choose between available profiles (e.g., Profile 1 or Profile 2). Profile 1 is usually the highest stable speed (e.g., 3600 MHz), while Profile 2 may be a lower speed or tighter timings.
Example: On an ASUS ROG Strix Z790-E with DDR5-5600 RAM, navigate to “Ai Tweaker” > “XMP” > “XMP I” to enable 5600 MHz.
Step 5: Save and Exit
-
Press F10 (or the designated key) to save changes and exit. Your PC will restart with the new RAM settings.
-
If the system fails to boot, it may automatically revert to default settings. Re-enter BIOS and try a different XMP profile or lower speed.
Step 6: Verify XMP Settings
After rebooting, confirm the RAM is running at the desired speed:
-
Windows: Use CPU-Z (“Memory” tab) or Task Manager (Ctrl+Shift+Esc > “Performance” > “Memory”) to check the RAM speed.
-
BIOS: Re-enter BIOS to verify the memory frequency and timings match the XMP profile.
-
Benchmarking Tools: Run MemTest86 or AIDA64 to test stability and performance.
Alternative: In Windows 11, go to Task Manager > Performance > Memory to view current speed.
Troubleshooting Common Issues
-
System Fails to Boot: If the PC doesn’t boot after enabling XMP, try a lower-speed profile or reset the BIOS by removing the CMOS battery or using the motherboard’s reset jumper. Ensure your PSU and cooling are adequate, as XMP may increase power demands.
-
Instability or Crashes: This could indicate incompatible RAM or an outdated BIOS. Update your motherboard’s BIOS from the manufacturer’s website (e.g., https://www.asus.com/, https://www.msi.com/). Test RAM with MemTest86 to identify errors.
-
XMP Not Available: If the XMP option is missing, your RAM or motherboard may not support it. Verify compatibility or consider manual overclocking (advanced users only).
Additional Tips for Optimal Performance
-
Update BIOS: Ensure your motherboard has the latest BIOS version to support newer RAM speeds and improve stability. Follow manufacturer instructions carefully, using a FAT32 USB drive for updates.
-
Cooling: High-speed RAM generates more heat. Ensure proper case airflow or consider RAM with heatsinks for better thermal performance.
-
Mixing RAM Kits: Avoid mixing different RAM kits, as mismatched speeds or timings can cause instability, even with XMP.
-
AMD Systems: On AMD motherboards, XMP may be labeled as DOCP or A-XMP. For Ryzen 7000 series, consider enabling EXPO (AMD’s equivalent to XMP) if supported by your RAM.
-
Power Supply: High-performance RAM settings may require a robust PSU. Check your PSU’s wattage and ensure it meets your system’s needs.
Real-World Performance Impact
User experiences on platforms like Reddit and Tom’s Hardware indicate that enabling XMP can improve gaming performance by 5-20% in CPU-bound scenarios (e.g., high-FPS esports titles) and reduce rendering times in applications like Adobe Premiere by up to 15%. For example, upgrading from 2400 MHz to 3600 MHz DDR4 on a Ryzen 5 5600X system showed noticeable improvements in game load times and multitasking.
Conclusion
Enabling XMP is a straightforward way to unlock your RAM’s full potential, offering significant performance gains for minimal effort. By verifying compatibility, accessing your BIOS, and selecting the appropriate XMP profile, you can boost your system’s speed and responsiveness. Always ensure your hardware is compatible, update your BIOS if needed, and test for stability to avoid issues. With this guide, you’re equipped to optimize your RAM performance confidently.
🔌 Is Your PSU Putting Your PC at Risk?
Don’t wait until it’s too late. A failing PSU can cause data loss, hardware damage, or even electrical hazards.
Check for these 7 warning signs today and keep your system safe.
FAQ
Is enabling XMP safe?
Yes, if your RAM and motherboard support it. It uses manufacturer-tested profiles.
Does XMP void warranty?
No. It’s an advertised feature of the RAM and motherboard.
Why does my PC not boot after enabling XMP?
Your CPU’s memory controller may not support the speed. Try a lower profile or update BIOS.

Hi, I’m Nghia Vo: a computer hardware graduate, passionate PC hardware blogger, and entrepreneur with extensive hands-on experience building and upgrading computers for gaming, productivity, and business operations.
As the founder of Vonebuy.com, a verified ecommerce store under Vietnam’s Ministry of Industry and Trade, I combine my technical knowledge with real-world business applications to help users make confident decisions.
I specialize in no-nonsense guides on RAM overclocking, motherboard compatibility, SSD upgrades, and honest product reviews sharing everything I’ve tested and implemented for my customers and readers.