
Introduction to Windows 11
Welcome to the definitive guide for Windows 11, Microsoft’s latest iteration of its venerable operating system. Released as a significant leap forward from its predecessor, Windows 10, Windows 11 ushers in a refreshed design philosophy, enhanced productivity features, and a more integrated ecosystem for modern computing. For decades, Windows has been the cornerstone of personal computing, powering billions of devices worldwide. Each new version brings advancements, refining the user experience and adapting to evolving technological landscapes. Windows 11 is no exception, representing a comprehensive overhaul designed to meet the demands of a hybrid work environment, advanced gaming, and intuitive creativity.
What is Windows 11?
At its core, Windows 11 is the latest major release of Microsoft’s Windows NT operating system. It was officially unveiled in June 2021 and began rolling out to eligible devices later that year. More than just a cosmetic update, Windows 11 represents a fundamental shift in user experience, prioritizing simplicity, security, and connectivity. It introduces a clean, modern aesthetic with rounded corners, new animations, and a centrally aligned Start menu and Taskbar, departing from the familiar left-aligned layout of previous Windows versions. Under the hood, Windows 11 is built upon the robust foundation of Windows 10, ensuring compatibility with a vast array of existing software and hardware. For a deeper dive into how operating systems work, read [What is an Operating System (OS)?] and [What is a Kernel in Computing?]
However, it mandates stricter hardware requirements, particularly concerning security features like TPM 2.0 (Trusted Platform Module) and Secure Boot, which are crucial for enhancing the system’s resilience against evolving cyber threats. This focus on security is paramount in today’s digital landscape, where data protection and system integrity are non-negotiable. Furthermore, Windows 11 is designed to be more efficient, leveraging advancements in processor technology and memory management to deliver a smoother, more responsive experience. It aims to bridge the gap between traditional desktop computing and the increasingly mobile-centric world, offering a flexible and adaptable platform for various devices, including desktops, laptops, and tablets. Its integration with cloud services and efforts to unify the user experience across different form factors underscore its vision as a versatile, future-ready operating system.
Key Features of Windows 11
Windows 11 is packed with a multitude of features designed to enhance productivity, creativity, and connectivity. One of the most noticeable changes is the redesigned Start menu, which is now centered on the Taskbar and offers a clean, simplified layout with “Recommended” files and “Pinned” apps. This new design aims to make it easier and faster to find what you need. The Taskbar itself has also been revamped, featuring new icons and a more streamlined appearance.
A significant productivity booster is the introduction of Snap Layouts and Snap Groups. These features allow users to effortlessly arrange multiple windows on their screen into predefined layouts, making multitasking much more intuitive. For instance, you can quickly snap three or four windows into a perfect grid, and Snap Groups remember your arrangement, allowing you to return to it with a single click even after minimizing the applications. This is particularly beneficial for users with large monitors or multiple displays.
Virtual Desktops have been significantly improved, offering greater customization and easier management. You can create separate Desktops for work, personal use, or gaming, each with its own background and set of applications, and switch between them seamlessly. This helps in decluttering your digital workspace and maintaining focus.
Communication is central to the Windows 11 experience, with Microsoft Teams now deeply integrated directly into the Taskbar. This allows for instant chat, video calls, and collaboration with friends, family, and colleagues, regardless of the device they’re using. The Widgets panel is another new addition, providing a personalized feed of information at a glance, including news, weather, calendar events, and more. It slides out from the left side of the screen, offering relevant updates without interrupting your workflow.
For gamers, Windows 11 introduces several groundbreaking features. DirectStorage, a technology originally developed for Xbox Series X/S, dramatically reduces game loading times by allowing graphics cards to access game assets directly from NVMe SSDs (Non-Volatile Memory Express Solid State Drives), bypassing the CPU. Auto HDR (High Dynamic Range) automatically upgrades thousands of DirectX 11 and DirectX 12 games to a richer, more vibrant visual experience on compatible HDR displays. These enhancements make Windows 11 a compelling platform for PC gaming.
**Learn more about storage technology:** [What is NVMe?] | [What is a Solid State Drive (SSD)?]
The Microsoft Store has also received a complete overhaul, boasting a new design, improved performance, and the ability to host a wider variety of apps, including traditional Win32 applications, PWAs (Progressive Web Apps), and even Android apps (via the Amazon Appstore integration, though this feature’s availability varies by region and device). This expanded ecosystem aims to provide users with more choice and convenience in discovering and installing applications.
Finally, the underlying architecture of Windows 11 is designed for greater efficiency and security. With mandatory requirements like TPM 2.0 and Secure Boot, the system is better protected against modern threats. Performance improvements include better resource management, leading to faster wake times from sleep and a generally more responsive operating system. These key features collectively position Windows 11 as a modern, efficient, and secure platform for the next generation of computing.
System Requirements for Windows 11
Upgrading to Windows 11 is an exciting prospect, but it’s crucial to ensure your hardware meets the necessary specifications. Microsoft introduced stricter system requirements for Windows 11 compared to its predecessors, primarily to enhance security, reliability, and performance. These requirements are in place to ensure that the operating system runs optimally and can fully leverage its advanced features. Understanding these specifications is the first step in a successful upgrade or new system purchase. Failing to meet the minimum requirements can lead to installation issues, performance bottlenecks, or even prevent the installation altogether. While some users might find workarounds to install Windows 11 on unsupported hardware, it’s generally not recommended by Microsoft, as it may lead to instability, lack of updates, and potential security vulnerabilities. Therefore, a thorough check of your system’s capabilities is essential before proceeding. Microsoft provides a PC Health Check app that can quickly assess your device’s compatibility. This tool is invaluable for a quick, definitive answer regarding your system’s readiness.
Minimum Hardware Specifications
To run Windows 11, your PC must meet the following minimum hardware specifications:
Processor: 1 gigahertz (GHz) or faster with 2 or more cores on a compatible 64-bit processor or System on a Chip (SoC). This means older 32-bit processors are not supported.
**Understanding architecture:** [What Does 32-bit and 64-bit Mean in Computers?]
RAM: 4 gigabytes (GB) of RAM. While 4GB is the minimum, for a smooth experience, more is highly recommended.
Storage: 64 GB or larger storage device. This ensures enough space for the operating system and essential applications.
System Firmware: UEFI (Unified Extensible Firmware Interface), Secure Boot capable. UEFI is a modern replacement for the traditional BIOS (Basic Input/Output System), offering faster boot times and enhanced security features. Secure Boot is a security standard that ensures your PC boots only using software trusted by the PC manufacturer.
**Deep dive into firmware:** [What is BIOS: Basic Input Output System] | [What is UEFI: Unified Extensible Firmware Interface]
TPM (Trusted Platform Module): TPM version 2.0. This is one of the most significant and often debated requirements. TPM 2.0 is a cryptographic processor that provides hardware-based security functions, crucial for features like Windows Hello and data encryption. Many modern PCs have TPM 2.0 either enabled by default or available to be enabled in the UEFI/BIOS settings.
Graphics Card: Compatible with DirectX 12 or later with WDDM 2.0 driver. This ensures modern graphics capabilities and driver support.
Display: High definition (720p) display that is greater than 9 inches diagonally, 8 bits per color channel.
Internet Connection and Microsoft Account: For Windows 11 Home edition, an internet connection and a Microsoft account are required to complete device setup on first use. For Pro and Enterprise editions, this requirement is typically for initial setup and certain features.
It’s important to note that even if your PC meets these minimum requirements, performance can vary greatly depending on the specific components. For instance, a fast SSD (Solid State Drive) will offer a significantly better experience than a traditional HDD (Hard Disk Drive), even if both meet the 64GB storage minimum. Regularly checking for updated drivers for your graphics card and other components is also crucial for optimal performance.
Recommended Hardware for Optimal Performance
While meeting the minimum requirements will allow Windows 11 to run, for a truly optimal and fluid experience, especially when multitasking, gaming, or engaging in demanding creative work, you’ll want hardware that surpasses the baseline. Microsoft designs Windows 11 to scale well across various hardware configurations, but certain components will dramatically enhance your daily usage.
For the processor, aiming for a modern Intel Core i5 (10th generation or newer) or AMD Ryzen 5 (3000 series or newer) or equivalent is highly recommended. These processors typically feature more cores and threads, higher clock speeds, and advanced architectures that handle Windows 11’s features and multiple applications with ease. If you frequently engage in video editing, 3D rendering, or complex data analysis, an Intel Core i7/i9 or AMD Ryzen 7/9 will provide a substantial performance boost.
**Hardware fundamentals:** [What is a CPU?] | [Understanding the Motherboard]
Regarding RAM, while 4GB is the minimum, 8GB should be considered the practical minimum for a smooth experience, and 16GB is the sweet spot for most users. If you run multiple demanding applications simultaneously, such as a web browser with many tabs, a photo editor, and a communication app, 16GB of RAM will prevent slowdowns and improve responsiveness. For professional users or hardcore gamers, 32GB or even 64GB of RAM can be beneficial.
Storage is another critical area. An NVMe SSD of 256GB or 512GB (or larger) is strongly recommended over traditional SATA SSDs or HDDs. NVMe SSDs offer significantly faster read and write speeds, which translates to quicker boot times, faster application loading, and a more responsive overall system. If you have a large library of games, media, or professional files, consider a larger NVMe SSD or a combination of an NVMe SSD for the operating system and frequently used applications, and a larger HDD for bulk storage.
For graphics, while integrated graphics can handle basic tasks, a dedicated GPU (Graphics Processing Unit) is highly recommended for gaming, video editing, and other graphically intensive applications. Modern NVIDIA GeForce RTX or AMD Radeon RX series cards will provide excellent performance, enabling you to enjoy DirectX 12 Ultimate features, Auto HDR, and high frame rates in games. Even a mid-range dedicated GPU will offer a far superior experience compared to integrated solutions.
Finally, consider your display. A high-resolution QHD (2560×1440) or 4K (3840×2160) display will enhance the visual experience, especially with Windows 11’s refined aesthetics. If you’re a gamer, a high refresh rate monitor (120Hz or higher) paired with a capable GPU will provide incredibly smooth gameplay. Ultimately, investing in these recommended hardware components will allow you to fully appreciate the speed, responsiveness, and advanced capabilities that Windows 11 has to offer, ensuring a premium computing experience for years to come.
Installation Process
Installing Windows 11 can be a straightforward process, but it requires careful attention to detail to ensure a smooth transition. There are several methods to install Windows 11, including upgrading from an eligible Windows 10 device, performing a clean installation using installation media, or using the Windows 11 Installation Assistant. For most users, upgrading directly through Windows Update is the easiest route if their system is already running Windows 10 and meets the requirements. However, a clean installation is often preferred by those looking for a fresh start, maximizing performance, and avoiding potential issues carried over from a previous operating system. Regardless of the method, preparation is key. This includes backing up your important data, ensuring you have enough free storage, and verifying your system’s compatibility. The steps outlined below focus on a clean installation using installation media, which provides the most control and is suitable for both new builds and existing systems.
Step-by-step Installation Process
The following table provides a general timeline for a clean installation of Windows 11. Actual durations may vary based on your internet speed, system hardware, and specific configurations.
| Step | Description | Duration |
|---|---|---|
| 1 | Check System Compatibility | 10 minutes |
| 2 | Download Windows 11 | 30 minutes |
| 3 | Create Installation Media | 15 minutes |
| 4 | Install Windows 11 | 1 hour |
| 5 | Initial Setup | 20 minutes |
Let’s break down each step in detail:
Step 1: Check System Compatibility
Before anything else, confirm your PC meets the minimum system requirements, especially for TPM 2.0 and Secure Boot.
Download and run Microsoft’s PC Health Check app. This tool will tell you if your PC is compatible.
If your PC isn’t compatible, the app will usually indicate why. For TPM 2.0 or Secure Boot, you might need to enable them in your system’s UEFI/BIOS settings. Accessing UEFI/BIOS typically involves pressing a key like Del, F2, F10, or F12 immediately after powering on your computer. Look for settings related to Security, Boot Options, or Advanced Settings to enable TPM and Secure Boot. Save changes and exit.
**Need help updating BIOS?** Check our guides: – [How to Update BIOS on ASUS Motherboards] – [Detailed Guide to Updating Gigabyte BIOS]
**Important:** Read [this cautionary tale] before attempting any BIOS updates.
Step 2: Download Windows 11
You’ll need the Windows 11 ISO file or directly use the Media Creation Tool.
Go to the official Microsoft Windows 11 download page.
Under “Create Windows 11 Installation Media,” click Download Now to get the Media Creation Tool. This tool simplifies the process of downloading the ISO and creating a bootable USB drive. Alternatively, you can download the Windows 11 Disk Image (ISO) directly if you prefer to use third-party tools or burn to a DVD.
Step 3: Create Installation Media
This step involves turning the downloaded Windows 11 files into a bootable USB drive or DVD.
Using the Media Creation Tool (Recommended):
Insert a USB flash drive with at least 8GB of storage. Ensure it’s empty or backed up, as all data will be erased.
Run the Media Creation Tool. Accept the license terms.
Select “Create installation media (USB flash drive, DVD, or ISO file) for another PC” and click Next.
Choose your language, edition (Windows 11), and architecture (64-bit). Click Next.
Select “USB flash drive” and choose your connected USB drive from the list. Click Next.
The tool will download Windows 11 and create the bootable USB drive. This can take some time depending on your internet speed.
Using a downloaded ISO and a third-party tool (e.g., Rufus):
Download the Windows 11 ISO directly.
Download and run a tool like Rufus.
Select your USB drive, then select the Windows 11 ISO file.
Ensure Partition scheme is set to GPT and Target system is UEFI (non CSM).
Click Start to create the bootable USB.
Step 4: Install Windows 11
Now, you’ll boot your PC from the newly created installation media.
Insert the bootable USB drive (or DVD) into the PC where you want to install Windows 11.
Restart your computer. As it starts, repeatedly press the Boot Menu key (often F12, F10, F8, or Esc, depending on your motherboard manufacturer) to bring up the Boot Device Options.
Select your USB drive (or DVD drive) from the list to boot from it. If you can’t access the Boot Menu, you might need to change the Boot Order in your UEFI/BIOS settings to prioritize the USB drive.
The Windows Setup screen will appear. Select your language, time, and keyboard preferences, then click Next.
Click Install now.
If prompted, enter your Windows product key. If you are reinstalling Windows or upgrading from an activated Windows 10, you can click “I don’t have a product key” as Windows will usually activate automatically after installation.
Choose the edition of Windows 11 you want to install (e.g., Windows 11 Home or Pro).
Accept the license terms and click Next.
For a clean installation, select “Custom: Install Windows only (advanced)”.
You’ll see a list of drives and partitions. Select the partition where you want to install Windows 11 (usually Drive 0 Partition X). If you’re doing a clean install on a new drive or want to erase everything, you can delete existing partitions and then select the unallocated space. Be extremely careful here, as deleting partitions will erase all data on them.
Click Next. The installation process will begin, copying files and restarting your PC multiple times. Do not remove the USB drive until the initial setup phase begins after the last restart.
Step 5: Initial Setup
After installation, your PC will restart into the out-of-box experience (OOBE).
Follow the on-screen prompts to select your region, keyboard layout, and connect to a network.
Sign in with your Microsoft account. If you don’t have one, you’ll be prompted to create one. For Windows 11 Home, a Microsoft account and internet connection are mandatory for setup.
Set up your PIN for faster sign-ins.
Go through privacy settings, choosing what data you want to share with Microsoft.
Choose how you plan to use your device (e.g., Gaming, Creativity, Productivity) to help tailor your experience.
Let Windows finalize the setup. This might take a few minutes.
Once complete, you’ll be greeted by the Windows 11 desktop, ready to use. Remember to install necessary drivers for your hardware and run Windows Update to get the latest security patches and feature enhancements.
**Complete installation guide:** For a detailed walkthrough with data preservation, see [How to Install or Update Windows 11 Without Data Loss]
**Streamlined installation:** Want a lighter Windows 11? Try [Streamline Your Windows 11 Installation with Nano11 Script]
User Interface and Navigation
Windows 11 introduces a visually striking and functionally streamlined user interface, designed to be more intuitive and aesthetically pleasing than its predecessors. The entire experience feels more cohesive, with a consistent design language applied across applications, menus, and system elements. This overhaul isn’t just about looks; it’s about simplifying interactions and enhancing productivity. The central alignment of the Start menu and Taskbar is perhaps the most noticeable change, giving the desktop a more balanced and modern feel, reminiscent of other popular operating systems. Beyond this, a new system font, updated icons, and subtle animations contribute to a polished and engaging user experience. Navigating Windows 11 is designed to be effortless, whether you’re a seasoned power user or new to the Windows ecosystem. Understanding the core elements of its interface will empower you to work more efficiently and make the most of your digital workspace. The focus on accessibility and ease of use ensures that the new design serves a broad range of users and their diverse computing needs.
Overview of the Start Menu
The Start menu in Windows 11 has undergone a significant transformation, moving from the traditional left-aligned position to a central location on the Taskbar. This shift is part of Microsoft’s effort to create a more balanced and accessible user experience. When you click the Start button (the Windows logo) or press the Windows key, the Start menu opens as a floating panel above the Taskbar, rather than expanding from the bottom left corner.
The new Start menu is divided into several key sections:
Pinned Apps: At the top, you’ll find a grid of your most frequently used or manually “Pinned” applications. This section is highly customizable, allowing you to add, remove, and rearrange app icons to suit your workflow. You can easily drag and drop apps to reorder them or right-click to “Unpin from Start” or “Pin to Taskbar.”
All Apps: A button in the top-right corner of the Pinned Apps section, often labeled All Apps, allows you to access a comprehensive alphabetical list of all installed applications on your system. This provides a familiar way to locate less frequently used software.
Recommended: Below the Pinned Apps is the “Recommended” section. This intelligent area displays recently opened files, frequently accessed documents, and newly installed applications. It’s designed to help you quickly pick up where you left off, making it a powerful productivity tool. The recommendations are dynamic and adapt to your usage patterns.
User Account and Power Options: At the bottom of the Start menu, you’ll find your user account picture and name. Clicking on it reveals options to “Change account settings,” “Lock,” “Sign out,” or access other user-related controls. To the right of this, the Power button offers standard options such as “Sleep,” “Shut down,” and “Restart.”
Search Bar Integration: While the Start menu itself doesn’t have an integrated search bar like in Windows 10, clicking the Start button immediately allows you to start typing to search for apps, files, or web content using Windows Search, which now has its own dedicated button on the Taskbar.
The design of the Start menu is clean, with rounded corners and subtle animations, contributing to the overall modern aesthetic of Windows 11. It prioritizes quick access to essential applications and recent activities, aiming to reduce clutter and streamline your interaction with the operating system.
Taskbar Features
The Taskbar in Windows 11 has also received a significant visual and functional overhaul, aligning with the operating system’s new design language. Its most striking change is its default central alignment, placing the Start button, Search, Task View, and Widgets icons, along with your pinned and open applications, in the middle of the screen. While centrally aligned by default, users do have the option to revert to the traditional left-aligned Taskbar through the Settings app for those who prefer the classic layout.
Key features and changes to the Taskbar include:
Central Alignment (with option for left): As mentioned, the default position is centered, but you can right-click an empty space on the Taskbar, select Taskbar settings, and under “Taskbar behaviors,” choose “Left” for the “Taskbar alignment.”
Pinned and Open Apps: Similar to previous versions, you can pin your favorite applications to the Taskbar for quick access. Open applications display a subtle indicator line beneath their icon. Hovering over an open application’s icon reveals a thumbnail preview of its window, allowing for quick switching.
Start Button: The iconic Windows logo is now centrally located and serves as the gateway to the new Start menu.
Search Icon: A dedicated Search icon (magnifying glass) provides instant access to Windows Search, allowing you to find apps, documents, settings, and web results quickly.
Task View: The Task View icon (two overlapping rectangles) opens a pane displaying all your open windows and active Virtual Desktops. This is where you can easily switch between applications and manage your different desktop environments.
Widgets: A new Widgets icon (a combination of blue and white squares) provides quick access to a personalized feed of information, including news, weather, calendar, and more. It slides out from the left edge of the screen.
Microsoft Teams Integration: Microsoft Teams Chat is now directly integrated into the Taskbar, allowing you to instantly connect with contacts via chat, voice, or video calls without opening the full Teams application. This is a significant step towards seamless communication.
System Tray and Notification Center: The right side of the Taskbar houses the system tray (often referred to as the Notification Area), which includes icons for network status, volume, battery, and other background processes. Clicking on these icons, or the time and date, opens the Quick Settings panel (for Wi-Fi, Bluetooth, Focus Assist, etc.) and the Notification Center, providing quick access to system controls and alerts.
No Drag-and-Drop for Files: One notable change is the removal of the ability to drag and drop files onto app icons on the Taskbar to open them, a feature present in Windows 10. This functionality is currently not available in Windows 11.
Unmovable Taskbar: The Taskbar in Windows 11 is fixed to the bottom of the screen and cannot be moved to the sides or top, unlike in previous Windows versions.
Overall, the Windows 11 Taskbar is designed for a cleaner, more focused experience, prioritizing essential functions and communication tools, while still offering customization options for alignment.
Virtual Desktops and Snap Layouts
Windows 11 significantly enhances multitasking capabilities through improved Virtual Desktops and the innovative introduction of Snap Layouts and Snap Groups. These features are designed to help users manage their digital workspace more efficiently, especially when dealing with numerous applications and projects.
Virtual Desktops (accessed via the Task View icon on the Taskbar) allow you to create multiple distinct desktop environments. Imagine having a separate desktop for work-related applications, another for personal browsing and social media, and perhaps a third for gaming. Each Virtual Desktop can have its own set of open applications, and you can even customize the background for each one, providing a clear visual distinction. Switching between these desktops is seamless, either by clicking the Task View icon and selecting the desired desktop, or by using keyboard shortcuts like Windows key + Ctrl + Left/Right arrow keys. You can easily drag and drop applications between desktops, rename desktops, and close them as needed. This feature is invaluable for decluttering your main workspace, improving focus, and organizing tasks logically. For instance, if you’re interrupted during a work session, you can quickly switch to a “personal” desktop without closing any work applications, then return to your work environment with everything exactly as you left it.
Snap Layouts are a brand-new feature in Windows 11 that revolutionize window management. Instead of manually resizing and arranging windows, Snap Layouts provide predefined templates to quickly organize your open applications on the screen. To use Snap Layouts, simply hover your mouse cursor over the maximize button (the square icon) in the top-right corner of any open window. A small flyout menu will appear, displaying various layout options, such as two windows side-by-side, three windows in different configurations, or four windows in a grid. Once you select a layout, the current window will snap into one of the available zones, and then Windows 11 will present you with the other open applications to fill the remaining zones. This makes it incredibly easy to set up a multi-window workspace in seconds, perfectly utilizing your screen real estate.
Building on Snap Layouts, Snap Groups take this functionality a step further. When you arrange a set of applications using a Snap Layout, Windows 11 intelligently remembers this arrangement as a Snap Group. This group then appears as a single entity on your Taskbar. For example, if you have Edge, Word, and Excel snapped into a three-way layout, this configuration becomes a Snap Group. If you minimize this group, you can restore all three applications to their exact snapped positions by simply hovering over one of the apps on the Taskbar and selecting the Snap Group thumbnail. This eliminates the tedious process of rearranging windows every time you switch tasks, making context switching much faster and more efficient. Both Virtual Desktops and Snap Layouts/Groups are powerful tools that significantly enhance productivity and streamline the user experience in Windows 11, making multitasking a breeze.
Customization Options
One of the enduring strengths of the Windows operating system has always been its extensive customization capabilities, and Windows 11 continues this tradition with a refined and accessible set of options. While the new design brings a more consistent aesthetic, it also provides users with ample opportunity to personalize their experience, making their PC truly their own. From changing the look and feel of your desktop to adjusting system behaviors, Windows 11 allows you to tailor the environment to your preferences, enhancing both comfort and productivity. The Settings app has been reorganized to make these options easier to find and manage, presenting a clear and intuitive interface for personalization. Whether you prefer a minimalist look, vibrant colors, or specific accessibility features, Windows 11 offers the tools to create a computing environment that perfectly suits your individual needs and style.
Personalizing the Desktop
Personalizing your desktop in Windows 11 is an intuitive process, allowing you to tailor the visual elements to match your style and improve your workflow. All primary customization options are conveniently located within the Settings app. To access them, simply right-click on an empty area of your desktop and select Personalize, or navigate to Start > Settings > Personalization.
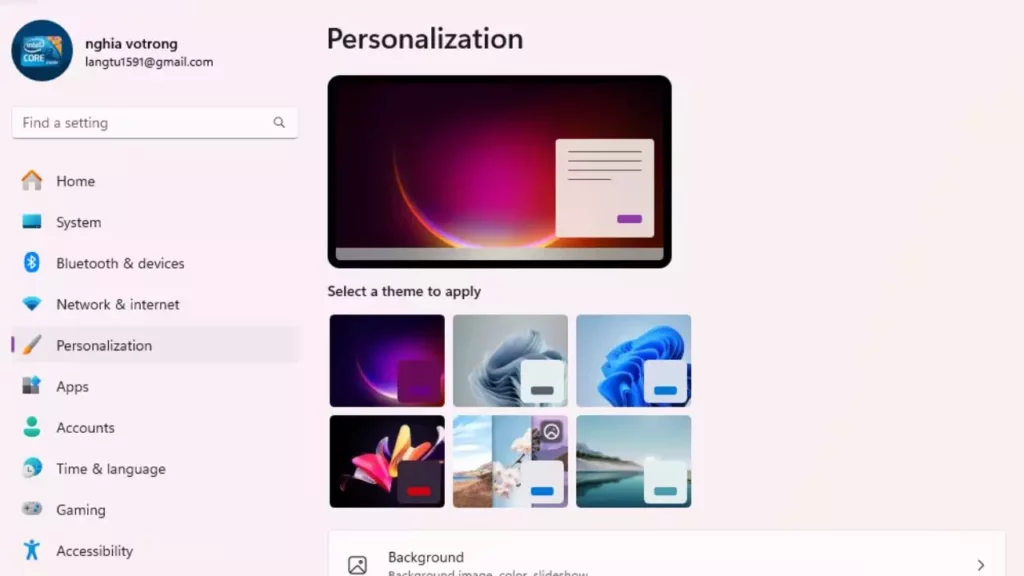
The Personalization section is comprehensive, offering control over several key aspects:
Background: This is where you can change your desktop background. You have several options:
Picture: Choose a single image from your existing photos or select one of the default Windows 11 wallpapers. You can also specify how the picture should fit on your screen (e.g., Fill, Fit, Stretch, Tile, Center, Span).
Solid color: Opt for a plain background in any color you choose.
Slideshow: Select a folder of images, and Windows 11 will automatically cycle through them at a set interval (e.g., every minute, every hour, daily). This keeps your desktop fresh and dynamic.
Windows Spotlight: This feature automatically downloads and displays new high-quality images from Microsoft, often accompanied by interesting facts. It’s a great way to discover beautiful new wallpapers regularly.
Colors: This section allows you to customize the color scheme of your operating system.
Choose your mode: You can select a Light or Dark mode for Windows, which affects the appearance of menus, apps, and system elements. Alternatively, select Custom to apply Dark mode to Windows and Light mode to apps, or vice versa.
Accent color: This color is used for highlights, such as active window borders, selected items, and certain app elements. You can choose from a palette of predefined colors or let Windows automatically pick an accent color from your background.
You can also toggle options to “Show accent color on Start and taskbar” and “Show accent color on title bars and window borders” for a more integrated look.
Themes: Themes are comprehensive packages that include a background, sounds, accent color, and mouse cursor. Windows 11 comes with several beautiful default themes, and you can download more from the Microsoft Store. You can also create and save your own custom themes by combining your preferred background, colors, and sounds.
Lock screen: Customize the image that appears when your computer is locked. Similar to the desktop background, you can choose a Picture, Slideshow, or Windows Spotlight. You can also select which apps display quick status updates on the lock screen.
Touch keyboard: Adjust the theme and size of the on-screen touch keyboard.
Start: Customize what appears on your Start menu, including which folders are shown next to the Power button (e.g., Documents, Pictures, Network).
Taskbar: This is where you can configure Taskbar behaviors, such as alignment (center or left), which system icons appear (e.g., Search, Task View, Widgets), and how icons are displayed.
By leveraging these personalization options, you can transform your Windows 11 desktop into a workspace that is not only visually appealing but also optimized for your unique preferences and productivity style.
Themes and Colors
Themes and Colors are fundamental to personalizing the aesthetic of your Windows 11 experience, allowing you to create an environment that resonates with your mood or enhances your focus. These settings are easily accessible via Start > Settings > Personalization > Themes or Colors.
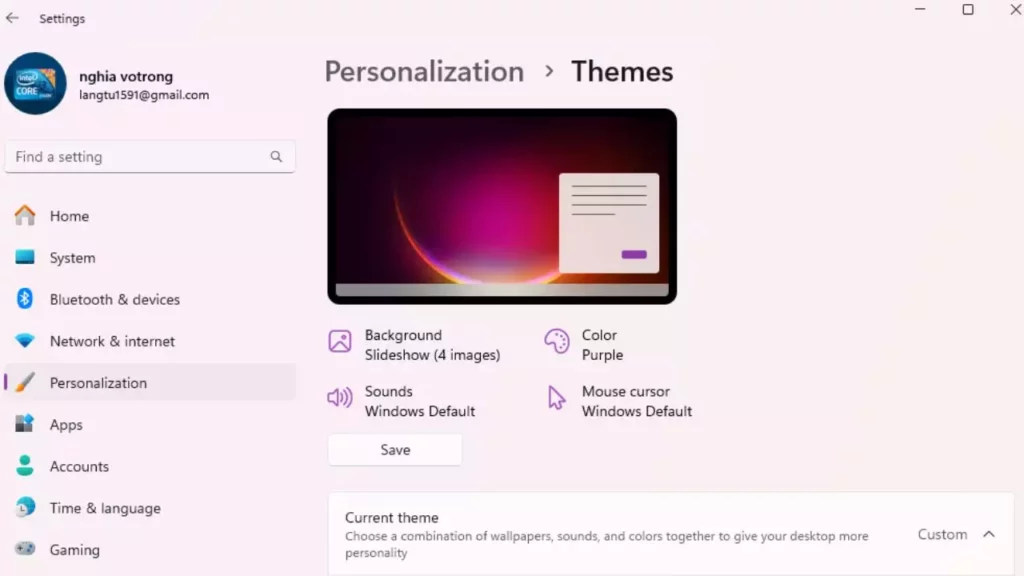
Themes in Windows 11 are comprehensive visual packages that bundle together several personalization elements into a single, cohesive style. A typical theme includes:
Desktop background: The image or slideshow that adorns your main screen.
Accent color: The primary color used for highlights in the Windows interface, such as selected menu items, active window borders, and certain app elements.
Sounds: A set of system sounds that play for various events (e.g., notifications, alerts, device connection).
Mouse cursor: The visual style of your mouse pointer.
Windows 11 comes pre-installed with a selection of elegant default themes, each offering a distinct look and feel. These themes often include beautiful high-resolution wallpapers and complementary color schemes. For instance, you might find themes tailored for Light mode or Dark mode, showcasing the operating system’s new visual design. To expand your collection, you can easily download additional themes from the Microsoft Store. These can range from artistic and abstract designs to themes based on nature, landscapes, or even branded content. Furthermore, Windows 11 empowers you to create your own custom themes. After adjusting your background, colors, sounds, and mouse cursor to your liking, you can save these settings as a new theme, allowing you to switch back to your personalized setup at any time. This flexibility ensures that your desktop can evolve with your preferences without having to reconfigure everything from scratch.
The Colors section provides granular control over the visual palette of your operating system. The most impactful setting here is “Choose your mode,” which allows you to select between Light, Dark, or Custom modes for the Windows interface and applications.
Light mode: Presents a bright, airy interface with light backgrounds and dark text, often preferred for daytime use or well-lit environments.
Dark mode: Features a darker background with lighter text, which can reduce eye strain in low-light conditions and save battery life on OLED displays.
Custom mode: Offers the flexibility to mix and match, for example, having a Dark Windows mode (for the Start menu, Taskbar, and Settings) but a Light app mode (for applications like Word or Edge).
Below the mode selection, you can manually choose an “Accent color” or allow Windows to “Automatically pick an accent color from my background.” This dynamic option creates a harmonious look by ensuring your system’s highlights complement your chosen wallpaper. Additionally, you can decide whether the accent color should apply to the Start menu and Taskbar, and to the title bars and window borders of applications. By carefully selecting and combining themes and colors, you can profoundly impact the overall feel of your Windows 11 environment, making it a more personal and comfortable space to work, play, and create.
Accessibility Features
Windows 11 is designed with a strong commitment to accessibility, offering a comprehensive suite of features to ensure that everyone, regardless of their abilities, can effectively use the operating system. These tools are integrated directly into the system, making them easy to find and configure, and are crucial for empowering users with diverse needs. All accessibility options are consolidated under Start > Settings > Accessibility, providing a centralized hub for managing these powerful tools.
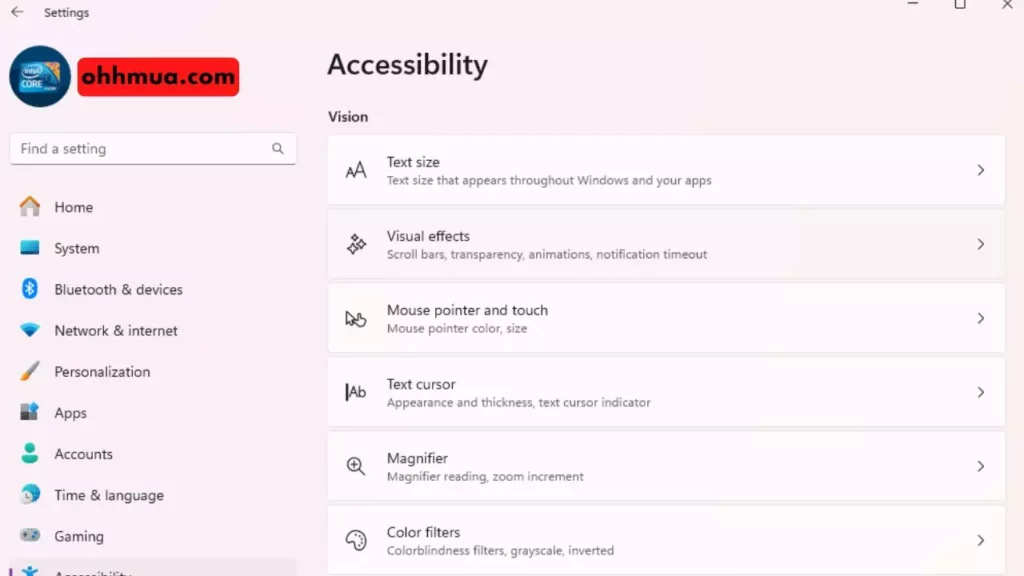
Key accessibility features in Windows 11 include:
Text size: For users with low vision, the ability to increase the global text size across Windows and compatible applications is invaluable. This can be adjusted without affecting the size of other UI elements, ensuring readability without distorting the layout.
Visual effects: This section allows users to disable certain visual flourishes that might cause discomfort or be distracting. Options include turning off “Animation effects” and “Transparency effects” to create a simpler, less dynamic interface.
Mouse pointer and touch: Users can customize the size and color of the mouse pointer, making it easier to see and track on the screen. There are options for white, black, inverted, or custom-colored pointers. For touch-enabled devices, settings related to touch feedback can also be adjusted.
Text cursor: The text cursor (the blinking line that indicates where you’re typing) can also be customized in terms of thickness and color, making it more visible within documents and text fields.
Magnifier: This built-in tool allows users to zoom in on parts of the screen or the entire screen. It offers various magnification levels and viewing modes (e.g., full screen, lens, docked) to assist users with visual impairments in viewing content more closely.
Color filters: Windows 11 provides a range of color filters to help users with color blindness or light sensitivity. Options include grayscale, inverted, deuteranopia (red-green), protanopia (red-green), and tritanopia (blue-yellow) filters, which can dramatically improve screen readability for affected individuals.
Narrator: This screen reader provides spoken descriptions of elements on the screen, allowing users who are blind or have severe visual impairments to navigate and interact with Windows without relying on visual cues. Narrator can read text, describe buttons, and provide feedback on actions.
Audio: This section includes settings for mono audio (combining left and right audio channels into one) for users with hearing loss in one ear, and options for displaying “Flash my screen during audio notifications” for visual alerts.
Captions: Users can customize the appearance of closed captions for videos and audio, adjusting font size, color, background, and effects to improve readability.
Speech: This feature allows users to control their PC using voice commands. It can be used for dictation, navigating the interface, and opening applications, providing an alternative input method for those who have difficulty using a keyboard or mouse.
Keyboard: Settings here include Sticky Keys (allowing modifier keys like Shift or Ctrl to be pressed one at a time), Filter Keys (ignoring brief or repeated keystrokes), and Toggle Keys (playing a sound when Caps Lock, Num Lock, or Scroll Lock are pressed). These are designed to assist users with physical dexterity challenges.
Mouse: This section provides options for Mouse Keys, which allows users to control the mouse pointer using the numeric keypad.
By integrating these comprehensive accessibility features, Windows 11 strives to create an inclusive computing environment, ensuring that its powerful capabilities are available to the widest possible audience.
Performance and Optimization
Maintaining optimal performance is crucial for any operating system, and Windows 11 is no exception. While it’s designed to be efficient and responsive, over time, various factors can lead to slowdowns or suboptimal performance. Understanding how to manage system resources, leverage specific features, and perform regular maintenance can significantly enhance your Windows 11 experience. This section will delve into practical strategies for keeping your system running smoothly, whether you’re a casual user or a demanding gamer. From tweaking system settings to ensuring your software is up-to-date, these tips will help you unlock the full potential of your Windows 11 PC and ensure it remains fast and reliable for all your tasks. Proactive maintenance and intelligent resource management are key to a consistently high-performing system.
Managing System Resources
Effective management of system resources is paramount for maintaining a fast and responsive Windows 11 experience. Your CPU, RAM, and storage are constantly at work, and knowing how to monitor and optimize their usage can prevent slowdowns and improve overall efficiency.
Task Manager: The most powerful tool for resource management is the Task Manager. You can open it by pressing Ctrl + Shift + Esc, right-clicking the Start button and selecting Task Manager, or using Ctrl + Alt + Del and choosing Task Manager.
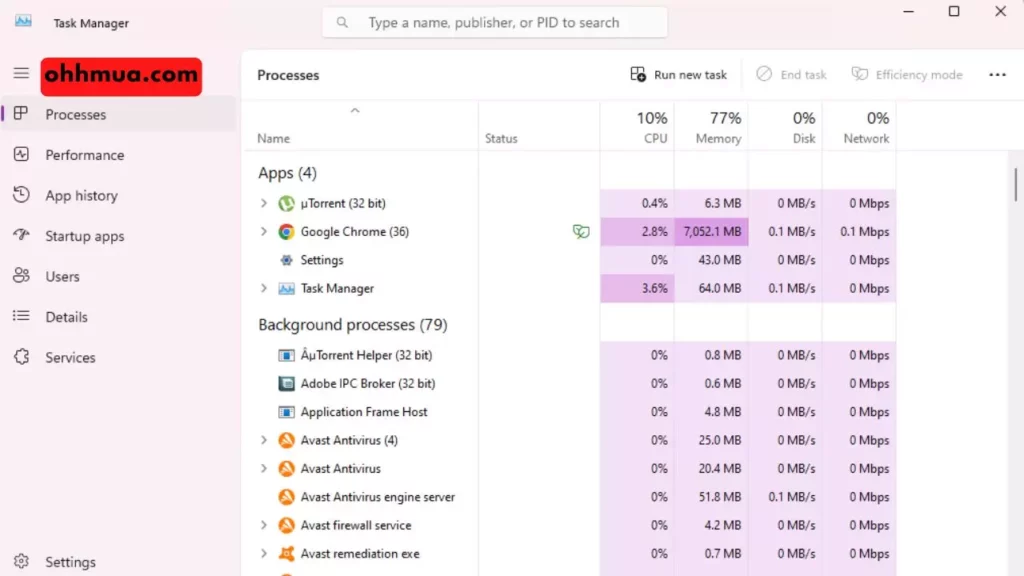
The Processes tab shows all running applications, background processes, and Windows processes, along with their resource consumption (CPU, Memory, Disk, Network, GPU). If your system feels slow, check this tab to identify resource-hungry applications. You can right-click on a process and select End task to close unresponsive or unnecessary applications.
The Performance tab provides real-time graphs of your CPU, Memory, Disk, and GPU usage, offering a quick overview of your system’s health.
The Startup tab allows you to manage programs that launch automatically when Windows starts. Disabling unnecessary startup programs can significantly speed up your boot time and free up RAM. Right-click on an entry and select Disable.
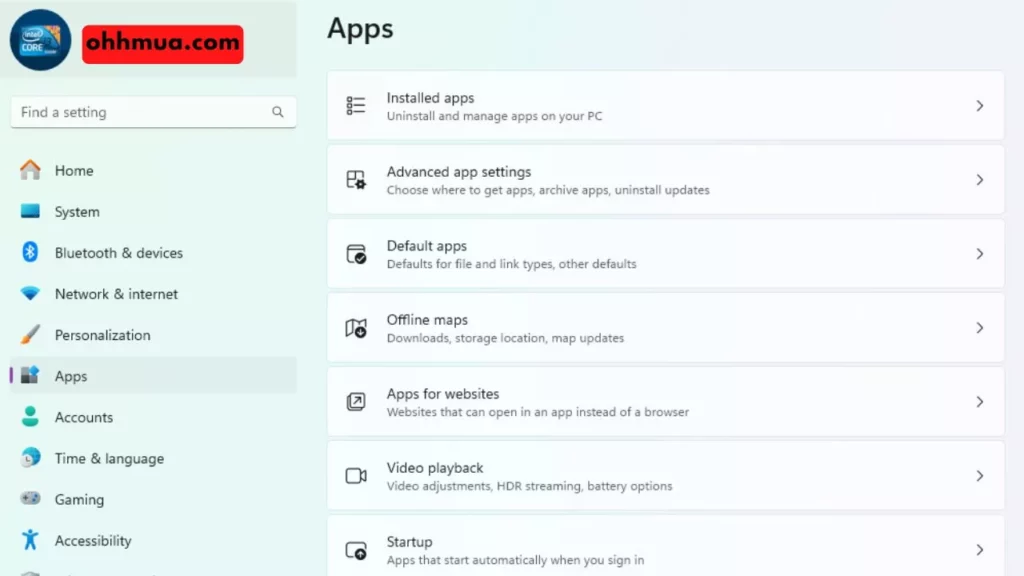
Background Apps: Many applications run in the background, consuming CPU and RAM even when you’re not actively using them. While Windows 11 is generally better at managing these, you can still control them. Navigate to Start > Settings > Apps > Apps & features. For some UWP (Universal Windows Platform) apps, you can click the three dots next to the app name, select Advanced options, and choose “Let this app run in background” to “Never” or “Power optimized.”
Storage Sense: Windows 11 includes Storage Sense, an intelligent tool that automatically frees up space by deleting temporary files, emptying the Recycle Bin, and managing cloud-backed content. Access it via Start > Settings > System > Storage. You can configure Storage Sense to run automatically at set intervals or run it manually. This helps ensure your storage drive doesn’t become overly cluttered, which can impact performance, especially on SSDs.
Defragment and Optimize Drives: While SSDs don’t need traditional defragmentation, Windows 11 still provides the Optimize Drives tool. For SSDs, this tool performs TRIM commands, which help maintain their performance over time. For traditional HDDs, it defragments files, improving access speeds. Search for “Defragment and Optimize Drives” in the Start menu.
Disable Visual Effects: If you have an older or less powerful system, disabling some of Windows 11’s visual effects can free up CPU and GPU resources. Search for “Adjust the appearance and performance of Windows” in the Start menu, then under the Visual Effects tab, select “Adjust for best performance” or customize individual options.
Power Mode: Adjusting your power mode can impact performance. Go to Start > Settings > System > Power & battery. For desktop users, selecting “Best performance” or “High performance” (if available) can ensure your CPU and GPU are always running at their peak. For laptops, balance this with battery life considerations.
By regularly monitoring and managing these system resources, you can ensure your Windows 11 PC remains snappy and efficient, capable of handling your daily tasks without unnecessary slowdowns.
**Comprehensive optimization guide:** [Optimize Windows for Faster Performance]
**Troubleshooting slowdowns:** If your system is still sluggish, diagnose the root cause: [Why is My PC Slow? Uncovering the Root Causes of Lag]
Windows 11 Gaming Features
Windows 11 has been specifically engineered to be the best Windows ever for gaming, introducing several groundbreaking features that significantly enhance the gaming experience. These innovations leverage modern hardware capabilities to deliver faster load times, more immersive visuals, and improved overall performance.
One of the most exciting additions for gamers is DirectStorage. This technology, originally pioneered for Xbox Series X/S, revolutionizes how games load assets. Traditionally, game data from an SSD had to pass through the CPU before reaching the GPU. With DirectStorage, the GPU can directly access and decompress game assets from high-speed NVMe SSDs, bypassing the CPU entirely. This dramatically reduces game loading times, often from minutes to mere seconds, and frees up CPU cycles for other tasks, leading to smoother gameplay and more responsive worlds. For games to take full advantage of DirectStorage, they must be developed with the API and require an NVMe SSD and a DirectX 12 Ultimate compatible GPU.
Another significant visual enhancement is Auto HDR (High Dynamic Range). For gamers with compatible HDR monitors, Auto HDR automatically upgrades thousands of older DirectX 11 and DirectX 12 games that don’t natively support HDR. It intelligently adds HDR enhancements, bringing out a wider range of colors and contrast, making game worlds look more vibrant, detailed, and realistic without any performance hit. This feature breathes new life into classic titles, offering a fresh visual experience.
Windows 11 also fully supports DirectX 12 Ultimate, the latest iteration of Microsoft’s graphics API. DirectX 12 Ultimate introduces advanced rendering techniques such as DirectX Raytracing (DXR), Variable Rate Shading (VRS), Mesh Shaders, and Sampler Feedback. These technologies enable developers to create incredibly lifelike graphics with realistic lighting, shadows, and reflections, while also optimizing performance. To benefit from DirectX 12 Ultimate, you’ll need a compatible GPU (e.g., NVIDIA RTX 20/30/40 series or AMD Radeon RX 6000/7000 series).
Beyond these core technologies, Windows 11 also integrates the Xbox app more deeply, serving as a central hub for Xbox Game Pass subscribers to discover, download, and play a vast library of games. The operating system also prioritizes gaming performance by optimizing resource allocation. When a game is running, Windows 11 can intelligently allocate more CPU and GPU resources to the game, minimizing background process interference and ensuring maximum frame rates. The new Game Mode (accessible via Settings > Gaming > Game Mode) further enhances this by preventing Windows Update from installing drivers or sending restart notifications during gameplay and by optimizing background processes.
Finally, the improved Virtual Desktops and Snap Layouts can also indirectly benefit gamers, allowing them to quickly switch between a game and other applications (like a game guide or streaming software) without losing focus or disrupting their gameplay. With these powerful features, Windows 11 solidifies its position as a premier platform for PC gaming, offering a cutting-edge experience for both casual and hardcore players.
Updates and Maintenance Tips
Keeping your Windows 11 system updated and well-maintained is crucial for security, performance, and stability. Regular updates not only introduce new features and improvements but also patch security vulnerabilities that could otherwise be exploited. Neglecting maintenance can lead to slowdowns, crashes, and potential data loss.
Windows Update: This is the most critical aspect of keeping your system healthy. Windows 11 automates much of the update process, but it’s good practice to check manually.
Navigate to Start > Settings > Windows Update.
Click Check for updates. Install any available updates, including optional driver updates.
Restart your PC when prompted, as many updates require a reboot to finalize installation.
Consider setting Active Hours in Windows Update settings. This tells Windows when you’re typically using your PC, preventing it from restarting automatically during your work or play sessions.
Driver Updates: While Windows Update handles many driver updates, sometimes specialized or newer drivers for your graphics card, chipset, or peripherals are available directly from the manufacturer’s website.
For GPU drivers (NVIDIA, AMD, Intel), always download the latest versions from their official websites for optimal gaming and application performance.
For other hardware, visit your PC manufacturer’s support page or the component manufacturer’s website.
Disk Cleanup and Storage Sense: Regularly free up disk space by removing unnecessary files.
**Storage management tip:** [How to Safely Increase C Drive Space in Windows]
Storage Sense (as mentioned previously) can automate this. Go to Start > Settings > System > Storage and ensure Storage Sense is turned on. You can also click “Temporary files” to manually review and delete specific categories of files.
You can also search for “Disk Cleanup” in the Start menu for a more traditional tool to remove system files and other temporary data.
Antivirus and Malware Protection: Windows 11 comes with Microsoft Defender Antivirus, which provides robust real-time protection.
Ensure Microsoft Defender is active and up-to-date. Go to Start > Settings > Privacy & security > Windows Security.
Regularly run full system scans to detect and remove any threats.
Keep Microsoft Defender’s definitions updated by checking Windows Update.
Browser Cache and Data: Web browsers accumulate a lot of cache, cookies, and history, which can slow them down over time. Periodically clear your browser’s cache and browsing data. Most browsers have this option in their Settings or History sections.
Uninstall Unused Apps: Remove applications you no longer use. These can take up valuable storage space and sometimes run background processes.
Go to Start > Settings > Apps > Apps & features.
Select the app you want to remove and click Uninstall.
Restart Regularly: While Windows 11 is good at managing resources, a full restart (not just sleep) can clear out temporary files, reset processes, and apply updates. It’s a simple but effective way to refresh your system and resolve minor glitches. Aim to restart your PC at least once a week.
Check System Health: Use the Event Viewer (search for it in the Start menu) to check for critical errors or warnings that might indicate underlying issues. While it can be complex, looking at “Critical” or “Error” events under Windows Logs > System can provide insights.
By following these update and maintenance tips, you can ensure your Windows 11 PC remains secure, performs optimally, and provides a stable computing environment for all your daily tasks.
Troubleshooting Common Issues
Even with its robust design, Windows 11 users may occasionally encounter issues, ranging from installation glitches to performance slowdowns. Knowing how to diagnose and resolve these common problems can save you time and frustration, helping you get back to a smooth computing experience. This section provides practical solutions and troubleshooting steps for the most frequently reported issues, empowering you to tackle problems confidently. From simple restarts to more advanced system resets, we’ll cover various approaches to ensure your Windows 11 system remains functional and responsive. Understanding these troubleshooting techniques is an essential part of mastering any operating system, allowing you to maintain control over your digital environment.
Common Installation Problems
Installing Windows 11 can sometimes hit a snag, especially due to its stricter hardware requirements. Here are some common installation problems and their solutions:
“This PC can’t run Windows 11” message: This is the most frequent issue.
Reason: Your PC doesn’t meet one or more minimum requirements, most commonly TPM 2.0 or Secure Boot not being enabled.
Solution:
1. Run the PC Health Check app to identify the exact incompatibility.
2. Access your UEFI/BIOS settings (restart PC and press Del, F2, F10, or F12).
3. Look for settings related to TPM (often called TPM Device, Security Device, Intel PTT, or AMD fTPM) and enable it.
4. Find Secure Boot settings (often under Boot Options or Security) and ensure it’s enabled. You might need to switch from CSM (Compatibility Support Module) or Legacy Boot mode to UEFI mode first.
5. Save changes and exit UEFI/BIOS. Then try the installation again.
Insufficient Storage Space:
Reason: The target drive (or partition) does not have the required 64GB or more free space.
Solution:
1. If upgrading from Windows 10, free up space using Storage Sense or Disk Cleanup. Uninstall large unused applications.
2. If performing a clean install, during the installation process, you can delete existing partitions to create unallocated space, then create a new partition or install into existing larger partition. Warning: Deleting partitions will erase all data.
Installation Media Not Booting:
Reason: The USB drive or DVD is not created correctly, or your PC isn’t configured to boot from it.
Solution:
1. Re-create the USB installation media using the official Media Creation Tool or a reliable tool like Rufus, ensuring it’s formatted for UEFI (GPT partition scheme).
2. Ensure your USB drive is properly inserted.
3. Access your PC’s Boot Menu (usually F12, F10, F8, or Esc) and manually select the USB drive to boot from.
4. Check your UEFI/BIOS settings to ensure the Boot Order prioritizes USB drives or that UEFI Boot is enabled.
Driver-related issues during installation (e.g., “No device drivers were found”):
Reason: The Windows 11 installer lacks a necessary driver for a critical component, like a storage controller (RAID controller) or a specific NVMe SSD.
Solution:
1. Download the specific driver (.inf or .sys files, usually from your motherboard or NVMe SSD manufacturer’s website) onto another USB drive.
2. During the Windows 11 installation, when prompted for a drive, click Load driver. Browse to the USB drive containing the downloaded driver files.
Installation freezes or crashes:
Reason: This can be due to faulty RAM, an unstable CPU overclock, a corrupted installation media, or a hardware conflict.
Solution:
1. Ensure your RAM is properly seated. If you have multiple RAM sticks, try installing with only one at a time to rule out a faulty stick.
2. Disable any CPU or GPU overclocks in your UEFI/BIOS.
3. Re-download the Windows 11 ISO and re-create the installation media.
4. Disconnect any non-essential peripherals during installation.
Addressing these issues systematically will help ensure a successful Windows 11 installation.
Performance Issues and Solutions
Even after a successful installation, users might experience performance issues in Windows 11, such as slow boot times, application lag, or general system unresponsiveness. Here are common performance problems and their effective solutions:
Slow Boot-up Times:
Reason: Too many programs launching at startup, fragmented HDD (if applicable), or an older SSD.
Solution:
1. Manage Startup Programs: Open Task Manager (Ctrl + Shift + Esc), go to the Startup tab, and disable unnecessary programs.
2. Check for Malware: Run a full scan with Microsoft Defender Antivirus or a third-party antivirus.
3. Update Drivers: Ensure your chipset and storage controller drivers are up to date.
4. Consider an SSD: If you’re still using an HDD, upgrading to an NVMe SSD will drastically improve boot times.
Applications Lagging or Freezing:
**Driver issues?** [How to Reset Graphics Drivers on Windows 11: A Complete Guide]
Reason: Insufficient RAM, high CPU usage by other processes, outdated graphics drivers, or corrupted application files.
Solution:
1. Check Task Manager: Identify which applications or background processes are consuming the most CPU or RAM. Close or End task for non-essential ones.
2. Increase RAM: If you frequently hit 100% RAM usage, consider upgrading your RAM to 16GB or more.
3. Update Graphics Drivers: Always keep your GPU drivers updated from the manufacturer’s website (NVIDIA, AMD, Intel).
4. Clear Browser Cache: If web browsers are slow, clear their cache and cookies.
5. Reinstall Problematic Apps: If a specific app is consistently lagging, try reinstalling it.
General System Unresponsiveness/Sluggishness:
Reason: Low disk space, excessive background processes, visual effects consuming resources, or malware.
Solution:
1. Free Up Disk Space: Use Storage Sense (Settings > System > Storage) to clear temporary files and unnecessary data. Aim to keep at least 15-20% of your drive free.
2. Disable Visual Effects: Search for “Adjust the appearance and performance of Windows” and select “Adjust for best performance” or disable specific effects.
3. Run System File Checker (SFC): Open Command Prompt as administrator and type `sfc /scannow` to check for and repair corrupted system files.
4. Run DISM Tool: If SFC fails, use DISM (Deployment Image Servicing and Management). In Command Prompt (Admin), type `DISM /Online /Cleanup-Image /RestoreHealth`.
5. Check Power Plan: Ensure your power plan is set to “Balanced” or “Best performance” (Settings > System > Power & battery).
High Disk Usage (100% Disk Usage):
Reason: Often caused by Windows Search indexing, Superfetch/SysMain, background antivirus scans, or certain applications.
Solution:
1. Disable Superfetch/SysMain (for HDDs only): Search for “Services” in the Start menu, find “SysMain,” right-click, select Properties, set Startup type to “Disabled,” and click Stop. Do not do this for SSDs.
2. Rebuild Search Index: Search for “Indexing Options” and click Advanced > Rebuild.
3. Check Antivirus: Ensure your antivirus isn’t continuously scanning.
4. Update Drivers: Especially storage controller drivers.
Frequent Crashes or Blue Screen of Death (BSOD):
Reason: Faulty hardware (especially RAM or SSD), corrupted drivers, or critical system file corruption.
Solution:
1. Update All Drivers: Ensure all drivers (chipset, graphics, audio, network) are up-to-date.
2. Run Memory Diagnostic: Search for “Windows Memory Diagnostic” and run it to check for RAM issues.
3. Check Disk for Errors: Open This PC, right-click on your system drive, go to Properties > Tools > Check (under Error checking).
4. Run SFC and DISM: As mentioned above, to repair system files.
5. Check Reliability Monitor: Search for “Reliability Monitor” to view a timeline of system events and identify patterns in crashes.
By systematically addressing these performance bottlenecks, you can significantly improve the speed and stability of your Windows 11 system.
How to Reset Windows 11
When all other troubleshooting steps fail, or if you simply want a fresh start, resetting Windows 11 is a powerful option. It allows you to reinstall the operating system, either keeping your personal files or removing everything, effectively bringing your PC back to a clean state. This can resolve deep-seated performance issues, persistent errors, or prepare your computer for a new user.
There are two primary ways to reset Windows 11:
1. Reset This PC (via Settings):
This is the most common and user-friendly method, accessible directly from within Windows 11.
Navigate to Settings: Go to Start > Settings > System > Recovery.
Initiate Reset: Under “Recovery options,” find “Reset this PC” and click the Reset PC button.
Choose a Reset Option: You’ll be presented with two main choices:
Keep my files: This option reinstalls Windows 11 but attempts to preserve your personal files (documents, pictures, etc.). It will remove all installed applications and drivers, and revert system settings to their defaults. You’ll need to reinstall your apps and drivers afterward.
Remove everything: This option performs a complete wipe, deleting all personal files, apps, and settings. This is ideal if you’re selling your PC or want a truly fresh start.
Choose How to Reinstall Windows:
Cloud download: Windows 11 will download a fresh copy of the operating system from Microsoft’s servers. This is generally more reliable and ensures you get the latest version, but requires an internet connection.
Local reinstall: Windows 11 will use files already on your device to reinstall. This is faster if you don’t have a fast internet connection, but the installation might be an older version, requiring more updates later.
Additional Settings (Optional): If you chose “Remove everything,” you’ll be asked if you want to “Clean data?”
Just remove my files: This is a quick file removal, sufficient for personal use.
Remove files and clean the drive: This option takes much longer but makes it harder to recover deleted files, which is recommended if you’re selling or donating your PC.
Confirmation: Review the summary of what the reset will do, then click Reset. Your PC will restart and begin the reset process, which can take some time.
2. Clean Install (using Installation Media):
This method involves booting from a USB drive or DVD with Windows 11 installation media and performing a fresh installation. This is the most thorough way to reset, as it completely reformats the drive, ensuring no remnants of previous issues.
Create Installation Media: Follow Step 3 from the “Installation Process” section to create a bootable USB drive with Windows 11.
Boot from Media: Follow Step 4 from the “Installation Process” section to boot your PC from the USB drive.
Perform Clean Install: When you reach the “Where do you want to install Windows?” screen, delete all existing partitions on your primary drive (e.g., Drive 0 Partition 1, Drive 0 Partition 2, etc.) until you have “Unallocated Space.” Select the unallocated space and click Next. This will perform a truly clean installation, removing everything.
Initial Setup: Proceed with the initial setup as described in Step 5 of the “Installation Process.”
Important Considerations Before Resetting:
Backup Your Data: Always back up all your important files to an external drive, cloud storage, or another computer before performing any reset, especially if you choose “Remove everything” or a clean install.
Gather Product Keys: Make sure you have product keys for any paid software you’ll need to reinstall.
Note Down Settings: If you have custom settings or configurations you want to restore, make a note of them.
Resetting Windows 11 is an effective way to resolve persistent problems and ensure your system runs optimally, providing a fresh and responsive computing experience.
Conclusion
Windows 11 represents a bold step forward for Microsoft’s flagship operating system, offering a blend of refined aesthetics, enhanced productivity tools, and powerful gaming features. From its redesigned Start menu and Taskbar to the intuitive Snap Layouts and deeply integrated Microsoft Teams, the user interface is crafted for a more focused and fluid experience. The introduction of DirectStorage and Auto HDR solidifies its position as a premier platform for gamers, while robust accessibility features ensure an inclusive environment for all users.
Frequently Asked Questions
What are the absolute minimum requirements for Windows 11?
The absolute minimum requirements include a 1 GHz, 2-core 64-bit CPU, 4GB of RAM, 64GB storage, UEFI firmware with Secure Boot, TPM 2.0, and a DirectX 12 compatible graphics card. An internet connection and Microsoft account are also needed for the Home edition setup.
Can I upgrade to Windows 11 for free?
Yes, if your existing Windows 10 PC meets the minimum system requirements, you can typically upgrade to Windows 11 for free through Windows Update. Microsoft rolls out these upgrades in phases.
What is TPM 2.0 and why is it required?
TPM 2.0 (Trusted Platform Module) is a cryptographic processor that provides hardware-based security functions. It’s required for Windows 11 to enhance security features like Windows Hello and data encryption, making the system more resilient against cyber threats.
Will my existing Windows 10 apps work on Windows 11?
Most applications that ran

Hi, I’m Nghia Vo: a computer hardware graduate, passionate PC hardware blogger, and entrepreneur with extensive hands-on experience building and upgrading computers for gaming, productivity, and business operations.
As the founder of Vonebuy.com, a verified ecommerce store under Vietnam’s Ministry of Industry and Trade, I combine my technical knowledge with real-world business applications to help users make confident decisions.
I specialize in no-nonsense guides on RAM overclocking, motherboard compatibility, SSD upgrades, and honest product reviews sharing everything I’ve tested and implemented for my customers and readers.